VMware提供了DC in Box的Ansible集成容器环境,无需用户预先准备Ansible 环境、及Python包、VIM,Git等工具。只需用户具备docker环境,通过docker run简单运行后即可实现NSX的自动化配置。
| Note:Github Dc in box 网址 https://github.com/vmware-nsx/dcinabox/tree/3.2.1在进行Ansible配置前,需要NSX OVA 已部署完成,Ansible Playbook本身不提供NSX OVA的安装。 |
Ansible环境部署
第1步:通过命令行运行Ansible部署NSX的容器环境。
| root@u1804ts:~# docker run -it quay.io/luca_camarda/ansible-for-nsxt-v3.2:v1.0 |
Unable to find image ‘quay.io/luca_camarda/ansible-for-nsxt-v3.2:v1.0’ locallyv1.0: Pulling from luca_camarda/ansible-for-nsxt-v3.27b1a6ab2e44d: Pull complete 88ab61c46959: Pull complete 0c3dc8ecffcb: Pull complete Digest: sha256:7623b5edddfef134d85f331ebc71157b43c63efaa5bf6214039a12f68fb7f829 Status: Downloaded newer image for quay.io/luca_camarda/ansible-for-nsxt-v3.2:v1.0 |
第2步:在容器中从github上克隆playbook和环境变量文件。
| root@a552d6d39244:/# git clone https://github.com/vmware-nsx/dcinabox |
Cloning into ‘dcinabox’…remote: Enumerating objects: 172, done.remote: Counting objects: 100% (172/172), done. remote: Compressing objects: 100% (110/110), done. remote: Total 172 (delta 77), reused 129 (delta 60), pack-reused 0 Receiving objects: 100% (172/172), 44.92 KiB | 200.00 KiB/s, done. Resolving deltas: 100% (77/77), done. |
| root@a552d6d39244:/dcinabox# ls |
| README.md dc_in_abox.yml nextgen_gateway_firewall.yml static_vars.yml user_defined_vars.yml |
第3步:检查Playbook对应NSX版本
root@a552d6d39244:/# cd dcinabox/root@a552d6d39244:/dcinabox# git checkout 3.2.1Branch ‘3.2.1’ set up to track remote branch ‘3.2.1’ from ‘origin’. Switched to a new branch ‘3.2.1’ |
变量配置修改
第1步:修改用户变量yaml,以适应实际环境
| root@a552d6d39244:/dcinabox# cat user_defined_vars.yml |
#This section cover the existing vCenter deployment.vcenter:fqdn: vcsa7sddc31.vmwlab.net ip: 192.168.60.17 username: administrator@vmwlab.net password: xxxxx cluster: CPT-C01 vds: vDS-BIZ01
#The NSX Manager appliace must be deployed from OVA already before running the playbook, you need to provide the credentials set during the deplyment process nsx: username: admin password: xxxxx
#In this section provide the VLAN ID for the 3 networks. #The uplink VLAN represent the transit network between the physical switches and the NSX Gateway #The overlay network represents the network where the TEP interfaces reside #The management network host the management appliances. i.e., vCenter, NSX Manager, Edge Nodes Management Interfaces…. uplink_vlan_id: ‘620’ overlay_vlan_id: ‘610’ #这里表明ESXi 和Edge所用TEP的VLAN均为610 management_vlan_id: ‘0’
#In this section provide the details about the uplink network. The uplink network must be a /28 as a minimum. uplink_network: snat_ip: 192.166.20.200 vip_ip: 192.166.20.201 edge01_ip: 192.166.20.101 edge02_ip: 192.166.20.102 gateway_ip: 192.166.20.254 prefix_length: 24
#In this section provid the details about the mananagement network. management_network: prefix_length: 24 gateway_ip: 192.168.60.254 nsx_manager_ip: 192.168.60.19 edge01_ip: 192.168.60.20 edge02_ip: 192.168.60.21 portgroup_name: SYS-MGT #嵌套环境,此portgroup需要开混杂,否则edge的无法与vc管理网络互通 nsxgateway_serviceinterface_present: False #When connecting the DC in a Box to an Untrusted external network (i.e., the Internet set this to True) nsxgateway_serviceinterface_ip: 192.168.100.1 #An IP for the service interface on the management network is only required if “nsxgateway_serviceinterface_present” is set to “True”
#Provide Edge Node VMs deployment information edge_nodes: size: MEDIUM #set to LARGE for TLS decryption and Gateway IDPS, and to XLARGE for Gateway Malware Detection edge1_datastore: ds-c01esxicpt31 edge1_host: c01esxicpt31.vmwlab.net edge2_datastore: ds-c01esxicpt32 edge2_host: c01esxicpt32.vmwlab.net password: xxxxx dns_servers: – 192.168.160.100 # – 192.168.110.11 add additional DNS Servers as members of a list |
第2步:(Optional)修改静态变量
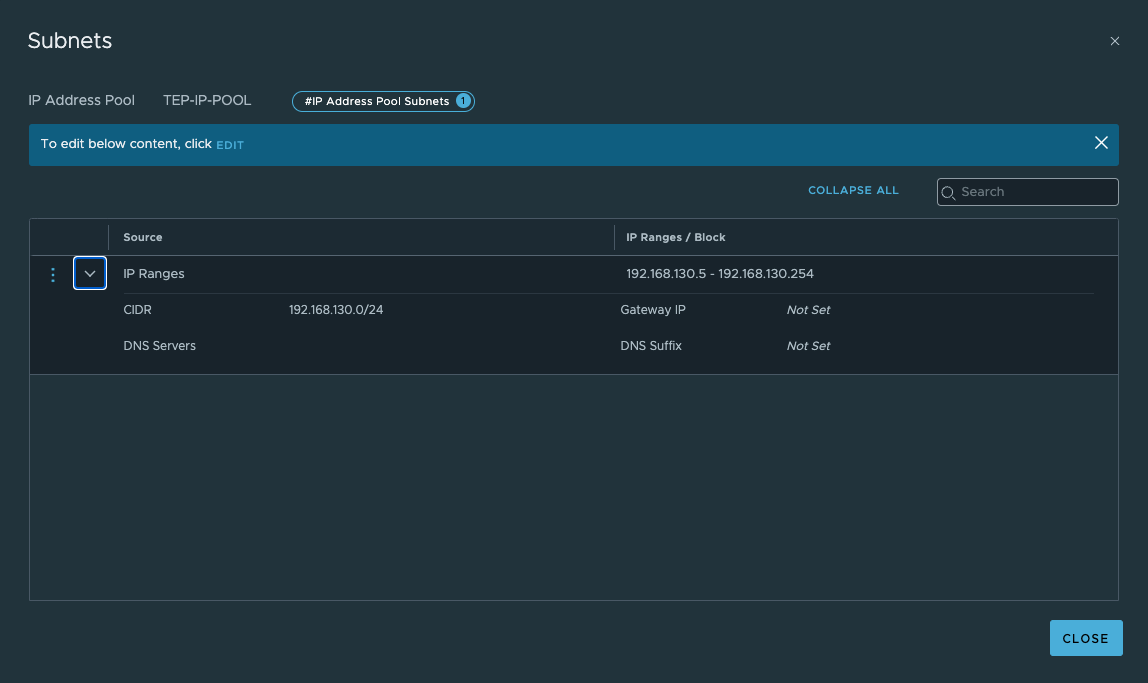
根据实际情况,本部分可不做修改,此次测试未改动此文件,为便于理解其自动化流程只做展示用途,此yaml文件中定义了TEP的IP Pool,如果需要自定义,可在此文件中进行配置。
| root@a552d6d39244:/dcinabox# cat static_vars.yml |
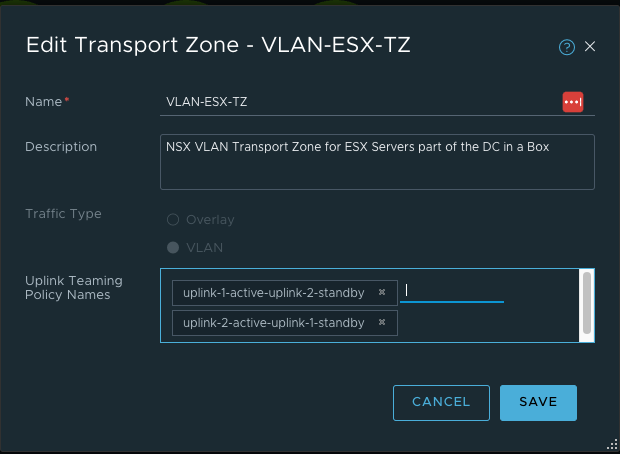
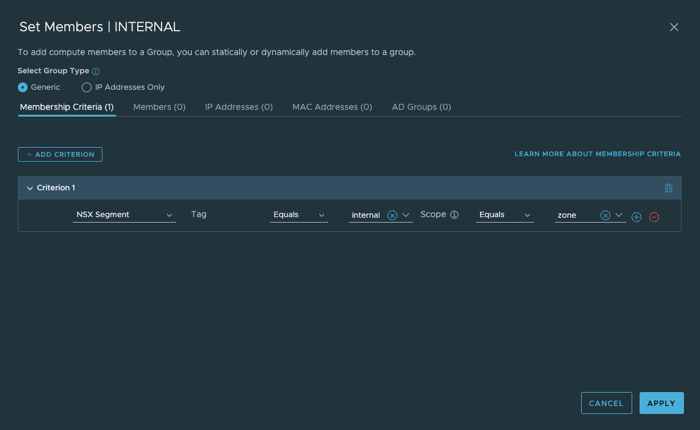
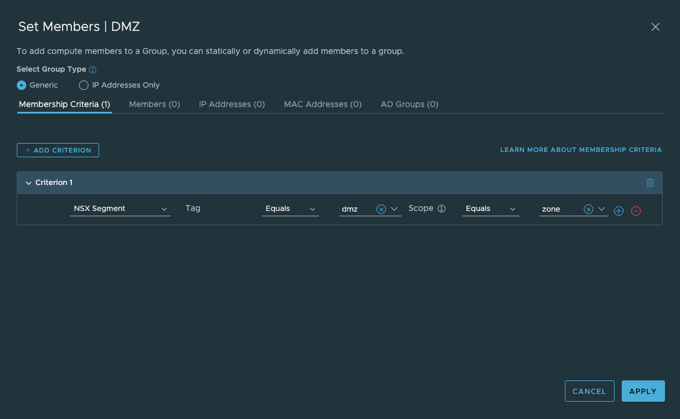
{## Flag to create or delete all the objects # Accepts: ‘present’ to create; ‘absent’ to delete # “state”: “present”, “mtu”: “9000”, # “validate_certs”: False, # # # # # First NSX appliance node. Defined separate based on the consumption. # Accepts both IP (IPv4) and FQDN for ‘mgmt_ip’ # “nsx_node1”: { “hostname”: “{{management_network.nsx_manager_ip}}”, “mgmt_ip”: “{{management_network.nsx_manager_ip}}”, “datacenter”: “Site”, “cluster”: “Cluster-01a”, “datastore”: “esx-011a-local”, “portgroup”: “SiteA-vDS-10-Management” }, “compute_managers”: [ { “display_name”: “{{vcenter.fqdn}}”, “mgmt_ip”: “{{vcenter.ip}}”, “origin_type”: “vCenter”, “credential_type”: “UsernamePasswordLoginCredential”, “username”: “{{vcenter.username}}”, “password”: “{{vcenter.password}}”, } ], “transport_zones”: [ { “display_name”: “OVERLAY-TZ”, “description”: “NSX Overlay Transport Zone for DC in a Box”, “transport_type”: “OVERLAY”, “uplink_teaming_policy_names”: [] }, { “display_name”: “VLAN-ESX-TZ”, “description”: “NSX VLAN Transport Zone for ESX Servers part of the DC in a Box”, “transport_type”: “VLAN”, “uplink_teaming_policy_names”: [ “uplink-1-active-uplink-2-standby” , “uplink-2-active-uplink-1-standby” ], “host_switch_name”: “dcinabox” } , { “display_name”: “VLAN-EDGE-TZ”, “description”: “NSX VLAN Transport Zone for Edge Nodes part of the DC in a Box”, “transport_type”: “VLAN”, “uplink_teaming_policy_names”: [ “uplink-1-only” ], “host_switch_name”: “dcinabox” } ], “tep_range”: { “start”: “192.168.130.5”, “end”: “192.168.130.254”, “cidr”: “192.168.130.0/24” }, #此部分是内置在静态变量里的,所以在用户变量定义中未让用户输入TEP地址段,因为HTN和ETN的TEP使用相同子网无需路由。 “segments”: [ { “display_name”: “DcInABox-Uplink-Trunk”, “transport_zone_name”: “VLAN-ESX-TZ”, “uplink_teaming_policy_name” : “uplink-1-active-uplink-2-standby”, “vlan_ids”: “{{uplink_vlan_id}},{{management_vlan_id}}” }, { “display_name”: “DcInABox-Overlay-Trunk”, “transport_zone_name”: “VLAN-ESX-TZ”, “uplink_teaming_policy_name” : “uplink-2-active-uplink-1-standby”, “vlan_ids”: “{{overlay_vlan_id}},{{management_vlan_id}}” } ], “edge_segments”: [ { “display_name”: “Edge-Uplink”, “transport_zone_name”: “VLAN-EDGE-TZ”, “uplink_teaming_policy_name” : “uplink-1-only”, “vlan_ids”: “{{uplink_vlan_id}}” }, { “display_name”: “Edge-Infra”, “transport_zone_name”: “VLAN-EDGE-TZ”, “uplink_teaming_policy_name” : “uplink-1-only”, “vlan_ids”: “{{management_vlan_id}}” } ], “overlay_segments”: [ { “display_name”: “INTERNAL”, “transport_zone_name”: “OVERLAY-TZ”, “connectivity_path”: “/infra/tier-0s/NSX-GATEWAY”, “subnets”: [ { “gateway_address”: “172.16.20.1/24” } ], “tags”: [ { “scope”: “zone”, “tag”: “internal” } ] }, { “display_name”: “DMZ”, “transport_zone_name”: “OVERLAY-TZ”, “connectivity_path”: “/infra/tier-0s/NSX-GATEWAY”, “subnets”: [ { “gateway_address”: “172.16.10.1/24” } ], “tags”: [ { “scope”: “zone”, “tag”: “dmz” } ] } ],
“ip_pools”: [ { “display_name”: “TEP-IP-POOL”, “subnets”: [ { “id”: “TEP_SUBNET”, “state”: “{{state}}”, “allocation_ranges”: [ { “start”: “{{tep_range.start}}”, “end”: “{{tep_range.end}}” } ], “cidr”: “{{tep_range.cidr}}” } ] } ],
“edge_uplink_profiles”: [ { “display_name”: “edge-uplink-profile”, “teaming”: { “active_list”: [ { “uplink_name”: “uplink-2”, “uplink_type”: “PNIC” } ], “policy”: “FAILOVER_ORDER” }, “named_teamings” : [ { “name”: “uplink-1-only”, “active_list”: [ { “uplink_name”: “uplink-1”, “uplink_type”: “PNIC” } ], “policy”: “FAILOVER_ORDER” }
], “transport_vlan”: “{{overlay_vlan_id}}”, “mtu”: “{{mtu}}” } ],
“host_uplink_profiles”: [ { “display_name”: “esx-uplink-profile”, “teaming”: { “active_list”: [ { “uplink_name”: “uplink-1”, “uplink_type”: “PNIC” }, { “uplink_name”: “uplink-2”, “uplink_type”: “PNIC” } ], “policy”: “LOADBALANCE_SRCID” }, “named_teamings” : [ { “name”: “uplink-1-active-uplink-2-standby”, “active_list”: [ { “uplink_name”: “uplink-1”, “uplink_type”: “PNIC” } ], “standby_list”: [ { “uplink_name”: “uplink-2”, “uplink_type”: “PNIC” } ], “policy”: “FAILOVER_ORDER” }, { “name”: “uplink-2-active-uplink-1-standby”, “active_list”: [ { “uplink_name”: “uplink-2”, “uplink_type”: “PNIC” } ], “standby_list”: [ { “uplink_name”: “uplink-1”, “uplink_type”: “PNIC” } ], “policy”: “FAILOVER_ORDER” } ], “transport_vlan”: “{{overlay_vlan_id}}”, } ],
“transport_node_profiles”: [ { “display_name”: “esxi-tn-profile”, “description”: “Compute Transport Node Profile”, “host_switches”: [ { “host_switch_profiles”: [ { “name”: “esx-uplink-profile”, “type”: “UplinkHostSwitchProfile” } ], “host_switch_name”: “{{vcenter.vds}}”, “host_switch_mode”: “STANDARD”, “host_switch_type”: “VDS”, “uplinks”: [ { “uplink_name”: “uplink-1”, “vds_uplink_name”: “Uplink 1” }, { “uplink_name”: “uplink-2”, “vds_uplink_name”: “Uplink 2” } ], “ip_assignment_spec”: { “resource_type”: “StaticIpPoolSpec”, “ip_pool_name”: “TEP-IP-POOL” }, “transport_zone_endpoints”: [ { “transport_zone_name”: “OVERLAY-TZ” }, { “transport_zone_name”: “VLAN-ESX-TZ” } ] } ] } ],
“transport_nodes”: [ { “display_name”: “nsx-edge-01”, “description”: “NSX Edge Node 01”, “host_switches”: [ { “host_switch_profiles”: [ { “name”: “edge-uplink-profile”, “type”: “UplinkHostSwitchProfile” } ], “host_switch_name”: “edge-nvds”, “host_switch_mode”: “STANDARD”, “pnics”: [ { “device_name”: “fp-eth0”, “uplink_name”: “uplink-1” }, { “device_name”: “fp-eth1”, “uplink_name”: “uplink-2” } ], “ip_assignment_spec”: { “resource_type”: “StaticIpPoolSpec”, “ip_pool_name”: “TEP-IP-POOL” }, “transport_zone_endpoints”: [ { “transport_zone_name”: “OVERLAY-TZ” }, { “transport_zone_name”: “VLAN-EDGE-TZ” } ], }], “node_deployment_info”: { “deployment_config”: { “vm_deployment_config”: { “vc_name”: “{{vcenter.fqdn}}”, “vc_username”: “{{vcenter.username}}”, “vc_password”: “{{vcenter.password}}”, “compute”: “{{vcenter.cluster}}”, “storage”: “{{edge_nodes.edge1_datastore}}”, “host”: “{{edge_nodes.edge1_host}}”, “management_network”: “{{management_network.portgroup_name}}”, “data_networks”: [ “DcInABox-Uplink-Trunk”, “DcInABox-Overlay-Trunk”, ], “management_port_subnets”: [ { “ip_addresses”: [ “{{management_network.edge01_ip}}” ], “prefix_length”: “{{management_network.prefix_length}}” } ], “default_gateway_addresses”: [ “{{management_network.gateway_ip}}” ], “placement_type”: “VsphereDeploymentConfig”, }, “form_factor”: “{{edge_nodes.size}}”, “node_user_settings”: { “cli_username”: “admin” , “root_password”: “{{edge_nodes.password}}”, “cli_password”: “{{edge_nodes.password}}”, “audit_username”: “audit”, “audit_password”: “{{edge_nodes.password}}” } }, “resource_type”: “EdgeNode”, “display_name”: “nsx-edge-01”, “node_settings”: { “allow_ssh_root_login”: “True”, “enable_ssh”: “True”, “hostname”: “nsx-edge-01”, “dns_servers”: “{{edge_nodes.dns_servers}}” } } }, { “display_name”: “nsx-edge-02”, “description”: “NSX Edge Node 02”, “host_switches”: [ { “host_switch_profiles”: [ { “name”: “edge-uplink-profile”, “type”: “UplinkHostSwitchProfile” } ], “host_switch_name”: “edge-nvds”, “host_switch_mode”: “STANDARD”, “pnics”: [ { “device_name”: “fp-eth0”, “uplink_name”: “uplink-1” }, { “device_name”: “fp-eth1”, “uplink_name”: “uplink-2” } ], “ip_assignment_spec”: { “resource_type”: “StaticIpPoolSpec”, “ip_pool_name”: “TEP-IP-POOL” }, “transport_zone_endpoints”: [ { “transport_zone_name”: “OVERLAY-TZ” }, { “transport_zone_name”: “VLAN-EDGE-TZ” } ], }], “node_deployment_info”: { “deployment_config”: { “vm_deployment_config”: { “vc_name”: “{{vcenter.fqdn}}”, “vc_username”: “{{vcenter.username}}”, “vc_password”: “{{vcenter.password}}”, “compute”: “{{vcenter.cluster}}”, “storage”: “{{edge_nodes.edge2_datastore}}”, “host”: “{{edge_nodes.edge2_host}}”, “management_network”: “{{management_network.portgroup_name}}”, “data_networks”: [ “DcInABox-Uplink-Trunk”, “DcInABox-Overlay-Trunk”, ], “management_port_subnets”: [ { “ip_addresses”: [ “{{management_network.edge02_ip}}” ], “prefix_length”: “{{management_network.prefix_length}}” } ], “default_gateway_addresses”: [ “{{management_network.gateway_ip}}” ], “placement_type”: “VsphereDeploymentConfig”, }, “form_factor”: “{{edge_nodes.size}}”, “node_user_settings”: { “cli_username”: “admin” , “root_password”: “{{edge_nodes.password}}”, “cli_password”: “{{edge_nodes.password}}”, “audit_username”: “audit”, “audit_password”: “{{edge_nodes.password}}” } }, “resource_type”: “EdgeNode”, “display_name”: “nsx-edge-02”, “node_settings”: { “allow_ssh_root_login”: “True”, “enable_ssh”: “True”, “hostname”: “nsx-edge-02”, “dns_servers”: “{{edge_nodes.dns_servers}}” } } } ],
“edge_clusters”: [ { “display_name”: “edge-cluster-01”, “cluster_profile_binding_id”: “91bcaa06-47a1-11e4-8316-17ffc770799b”, “members”: [ { “transport_node_name”: “nsx-edge-01” }, { “transport_node_name”: “nsx-edge-02” } ] }, ] } |
开始自动化配置
第1步:运行Playbook 开始部署 DC in Box
| root@a552d6d39244:/dcinabox# ansible-playbook dc_in_abox.yml |
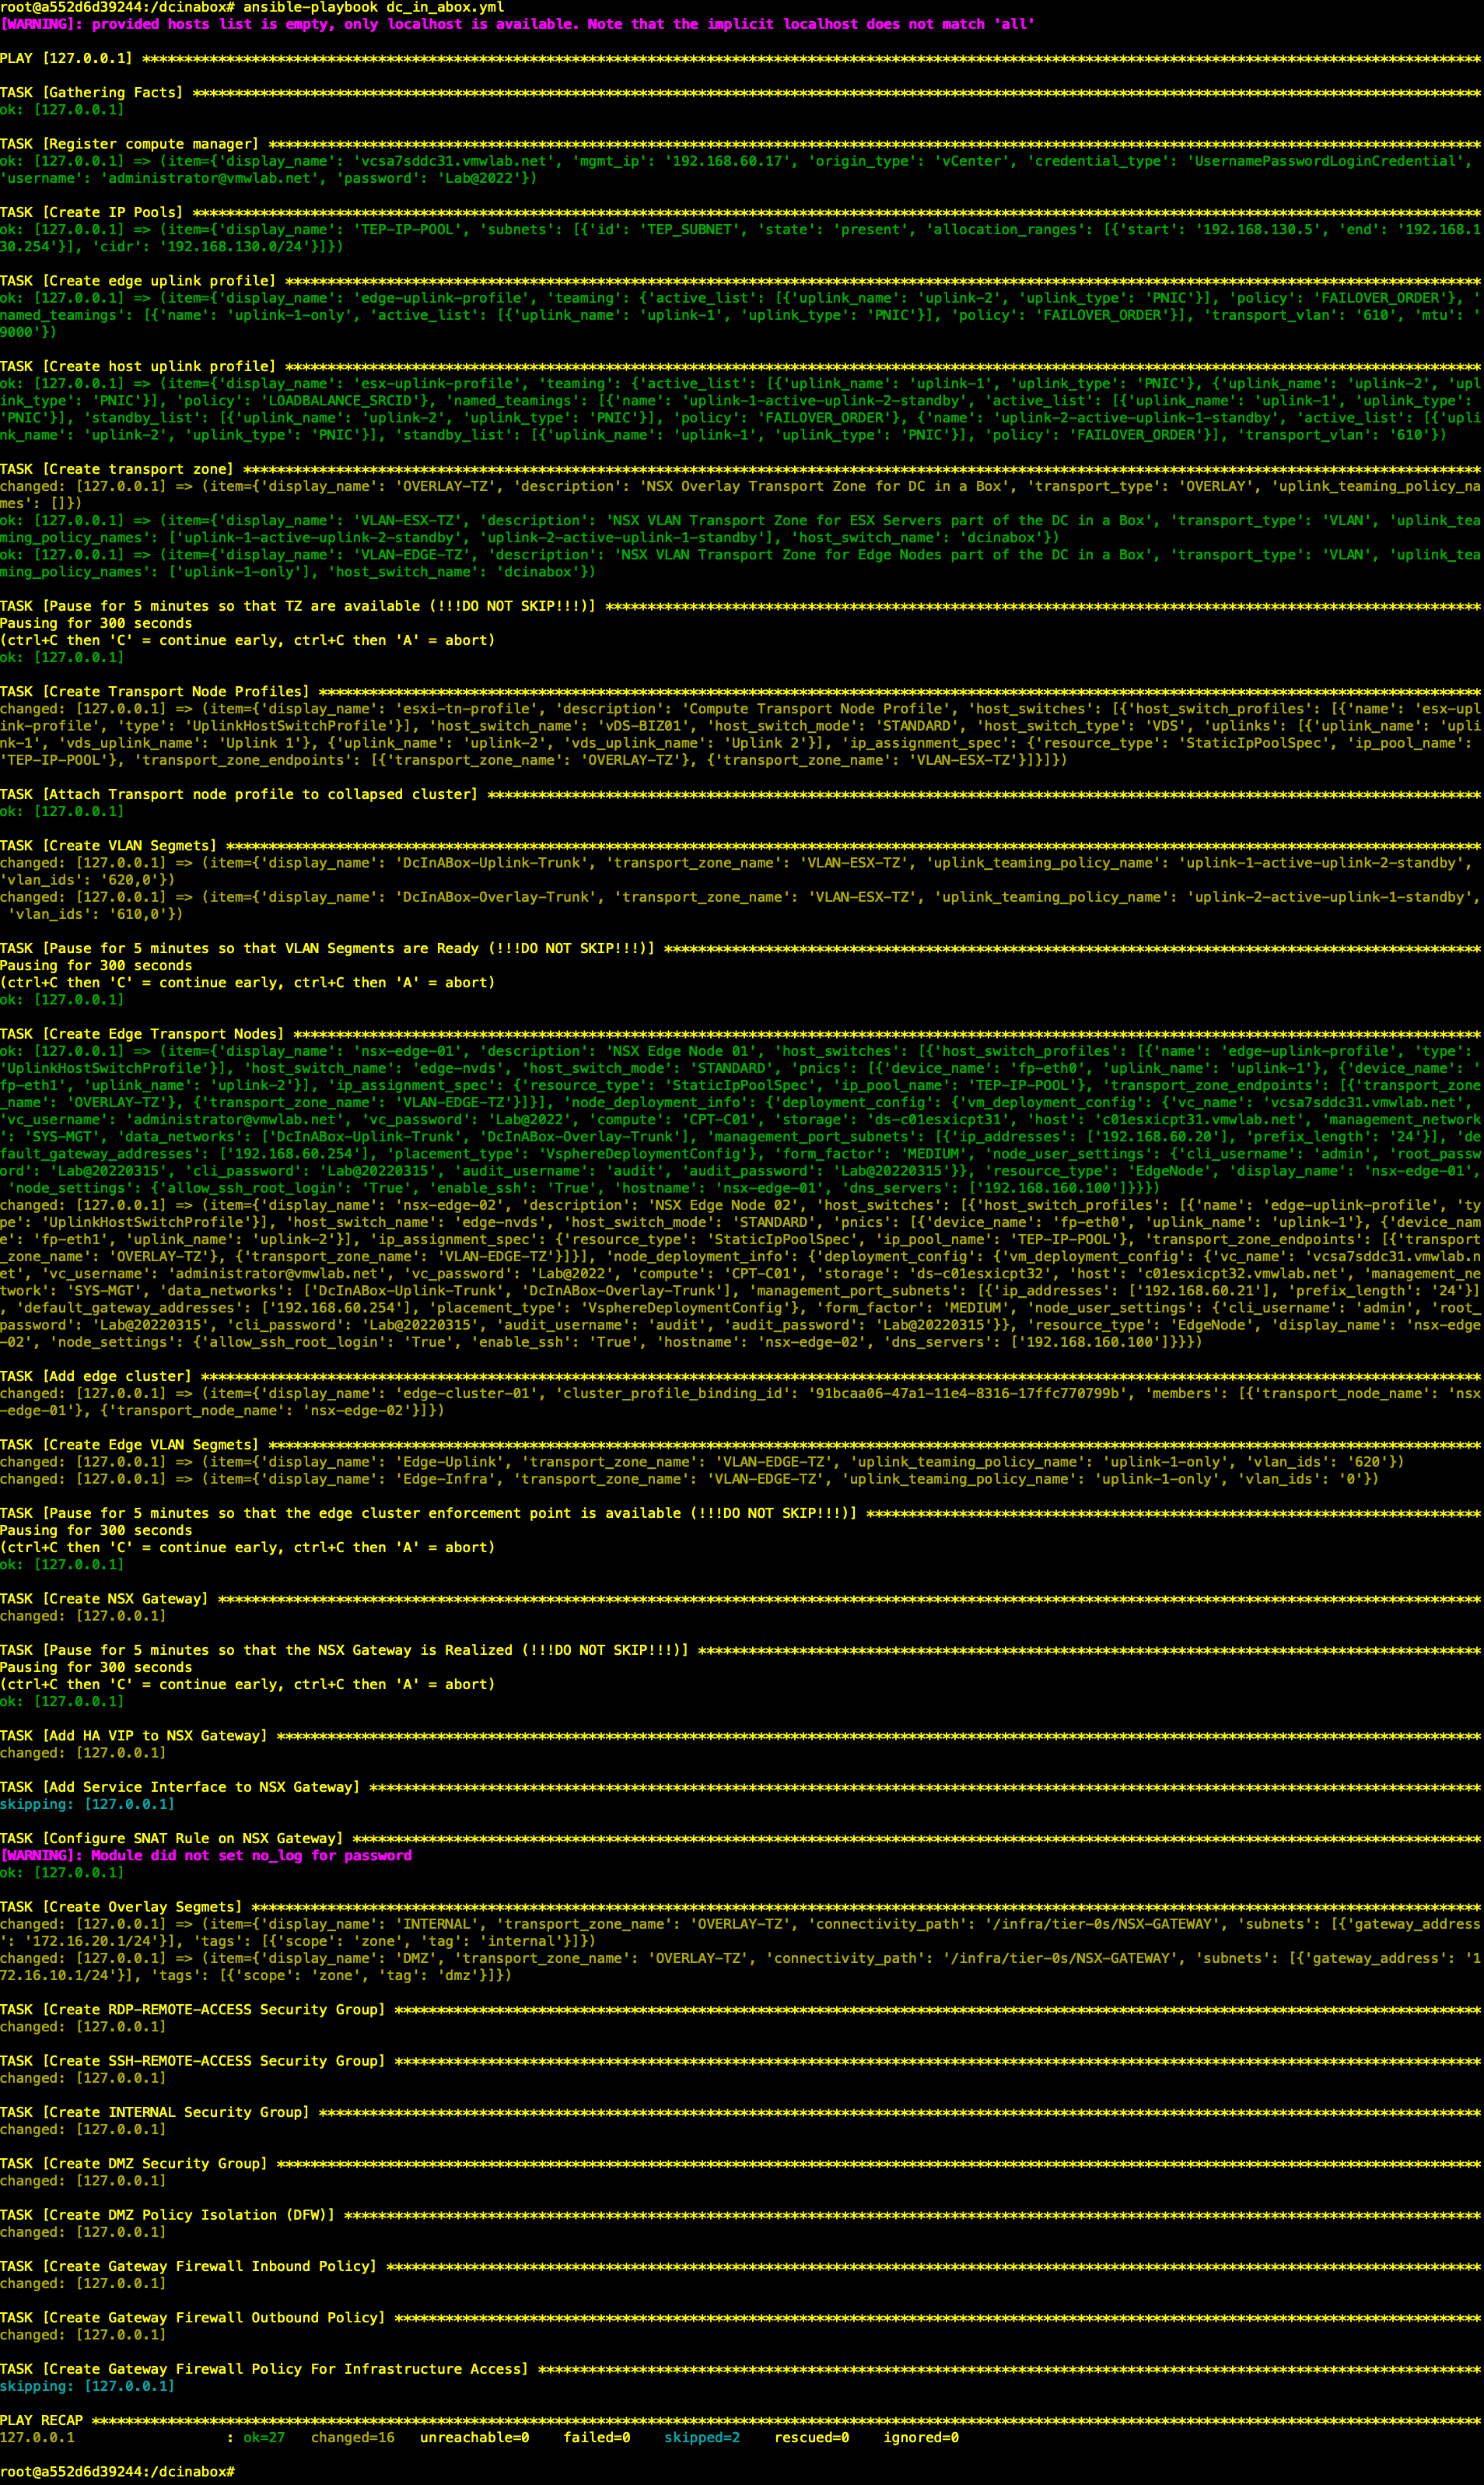
阶段性自动化成果
此阶段完成后,登录NSX Manager,已自动完成了如下部署:
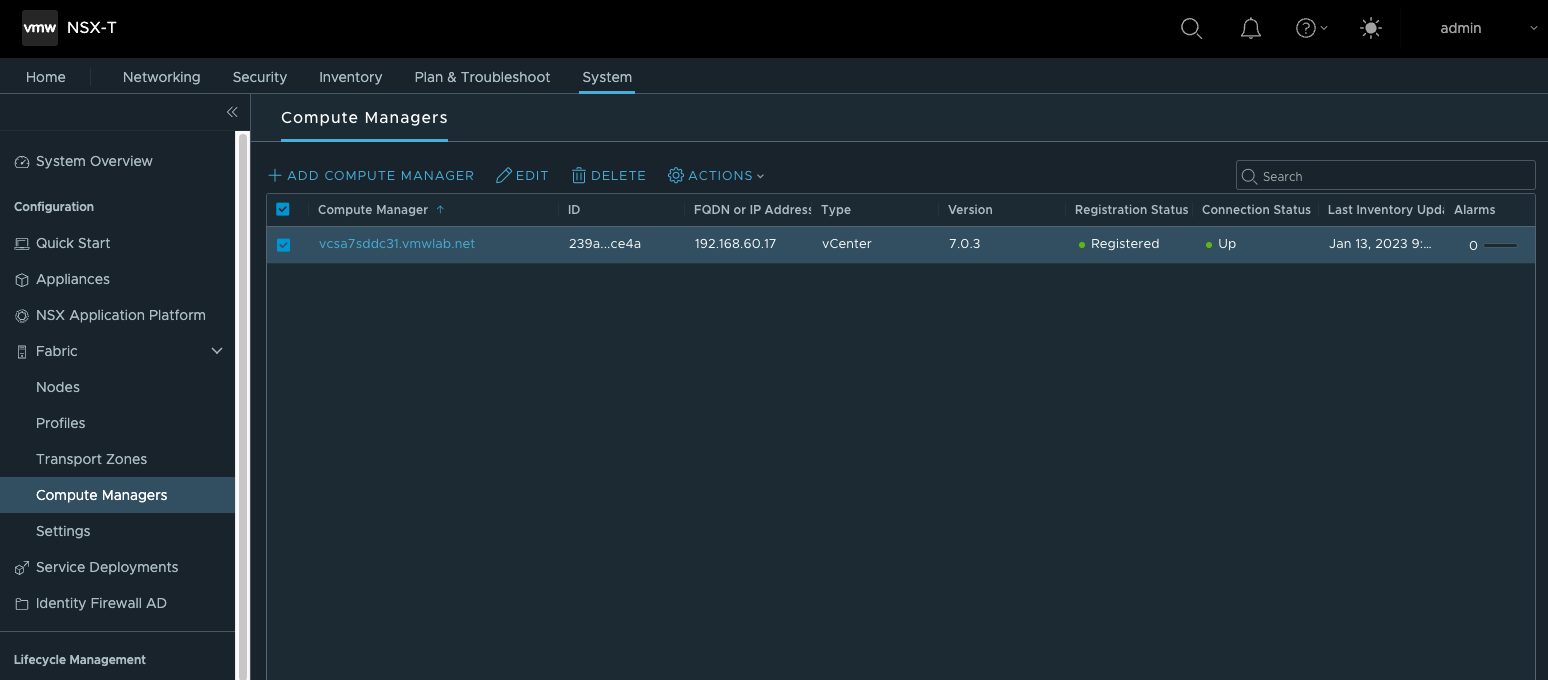
- 创建并注册Computer Manager

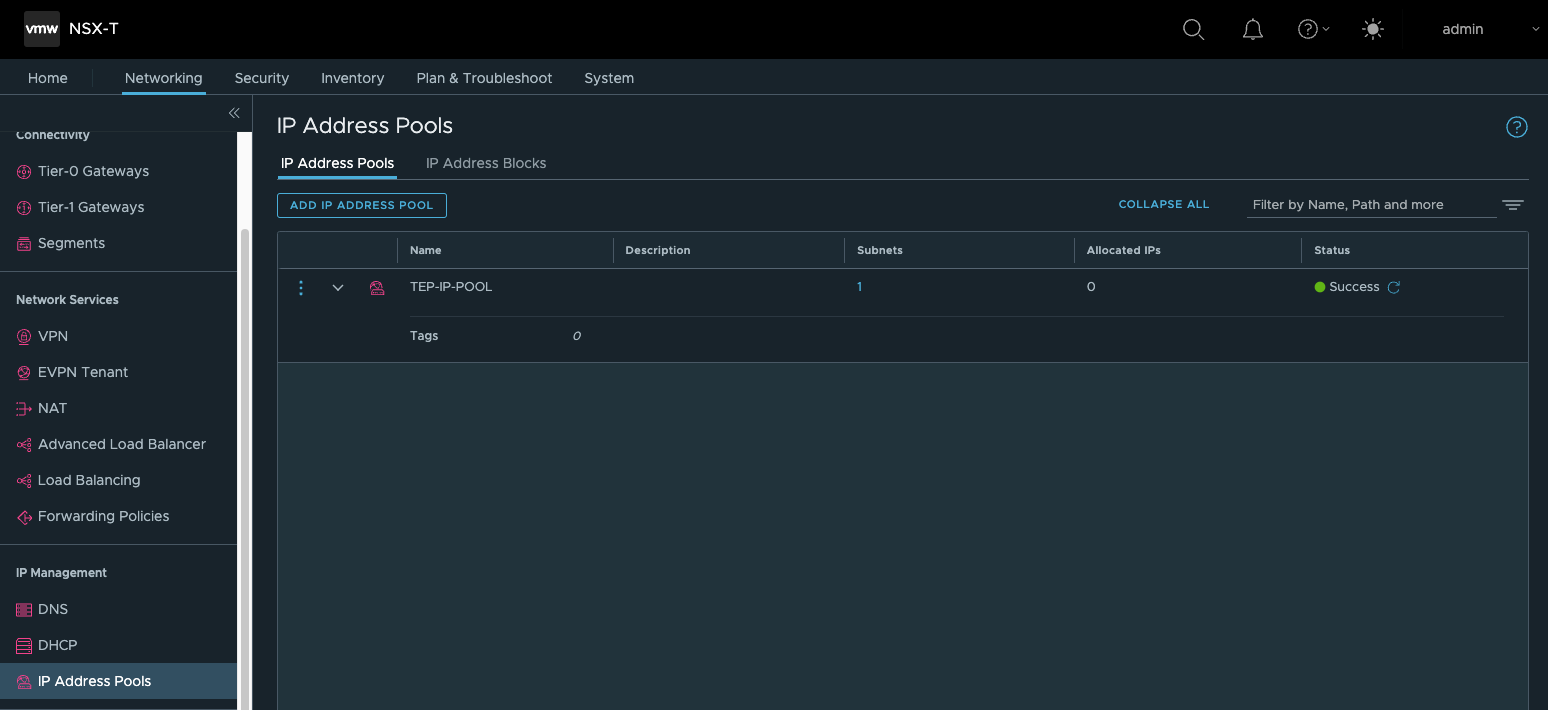
- 创建TEP所需的IP Pools

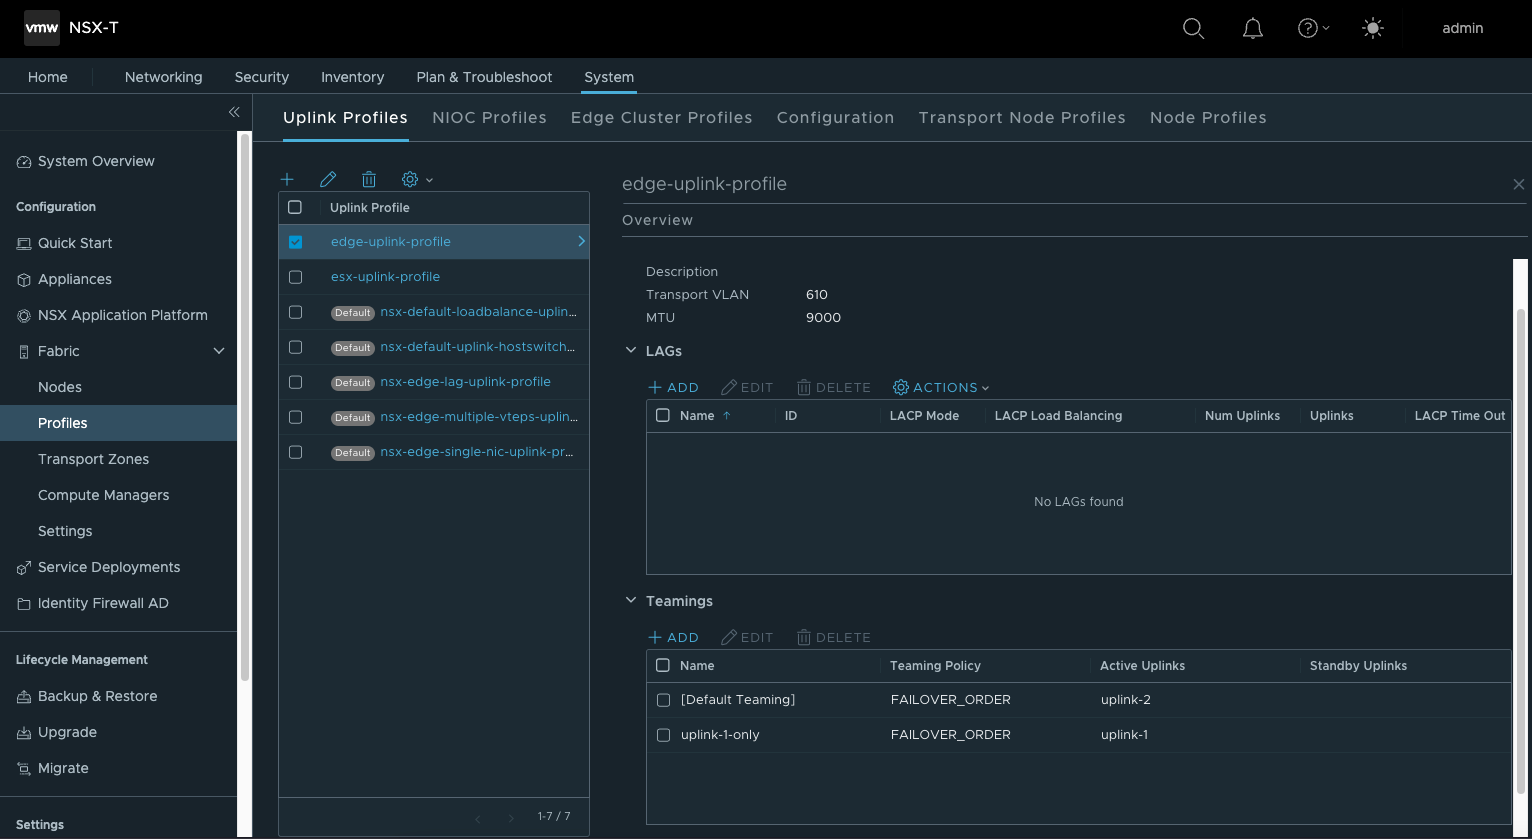
- 创建Edge Uplink Profile

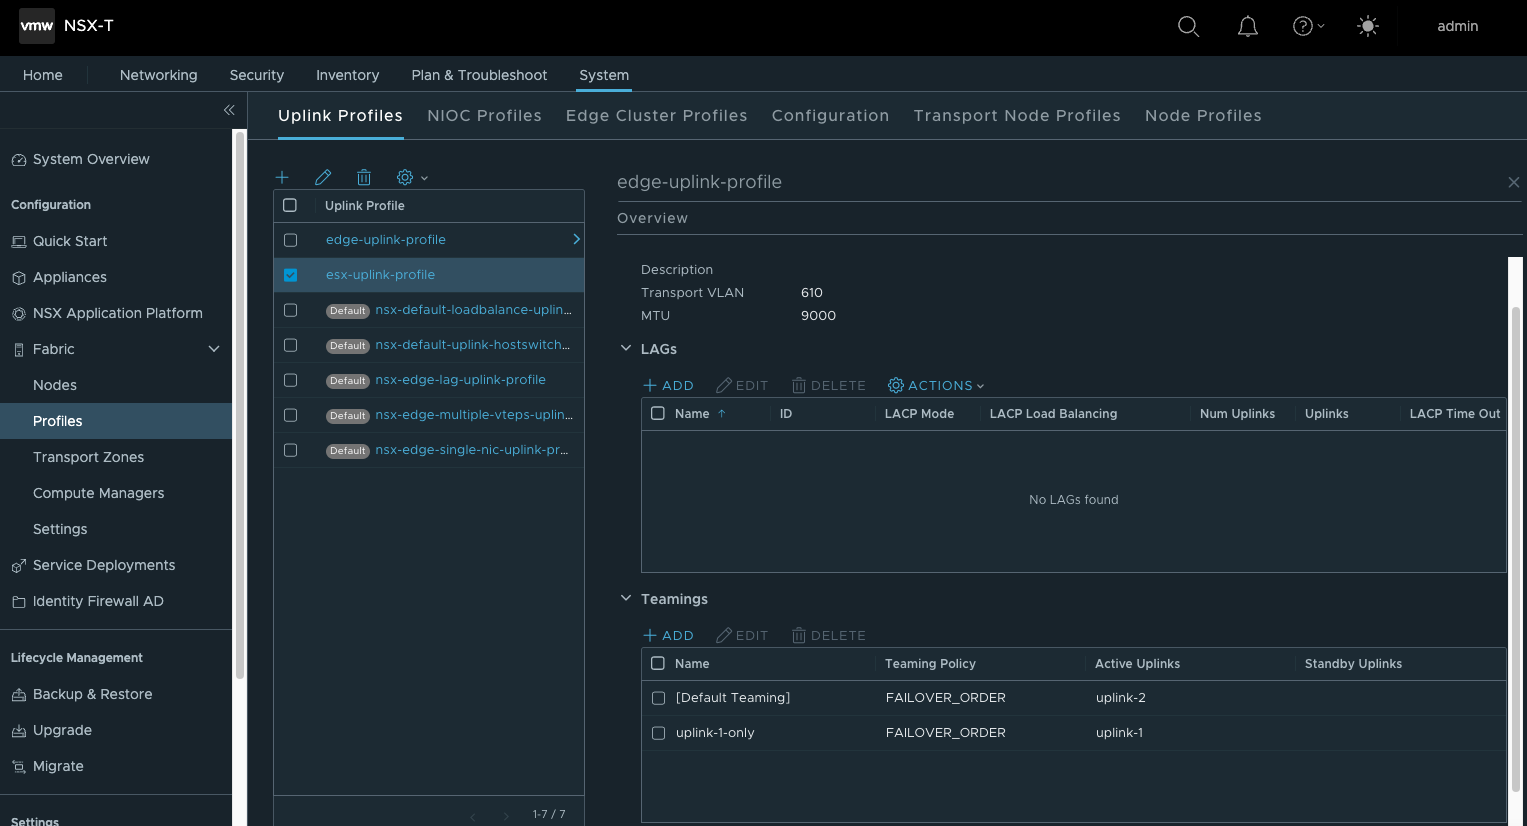
- 创建Host Uplink Profile

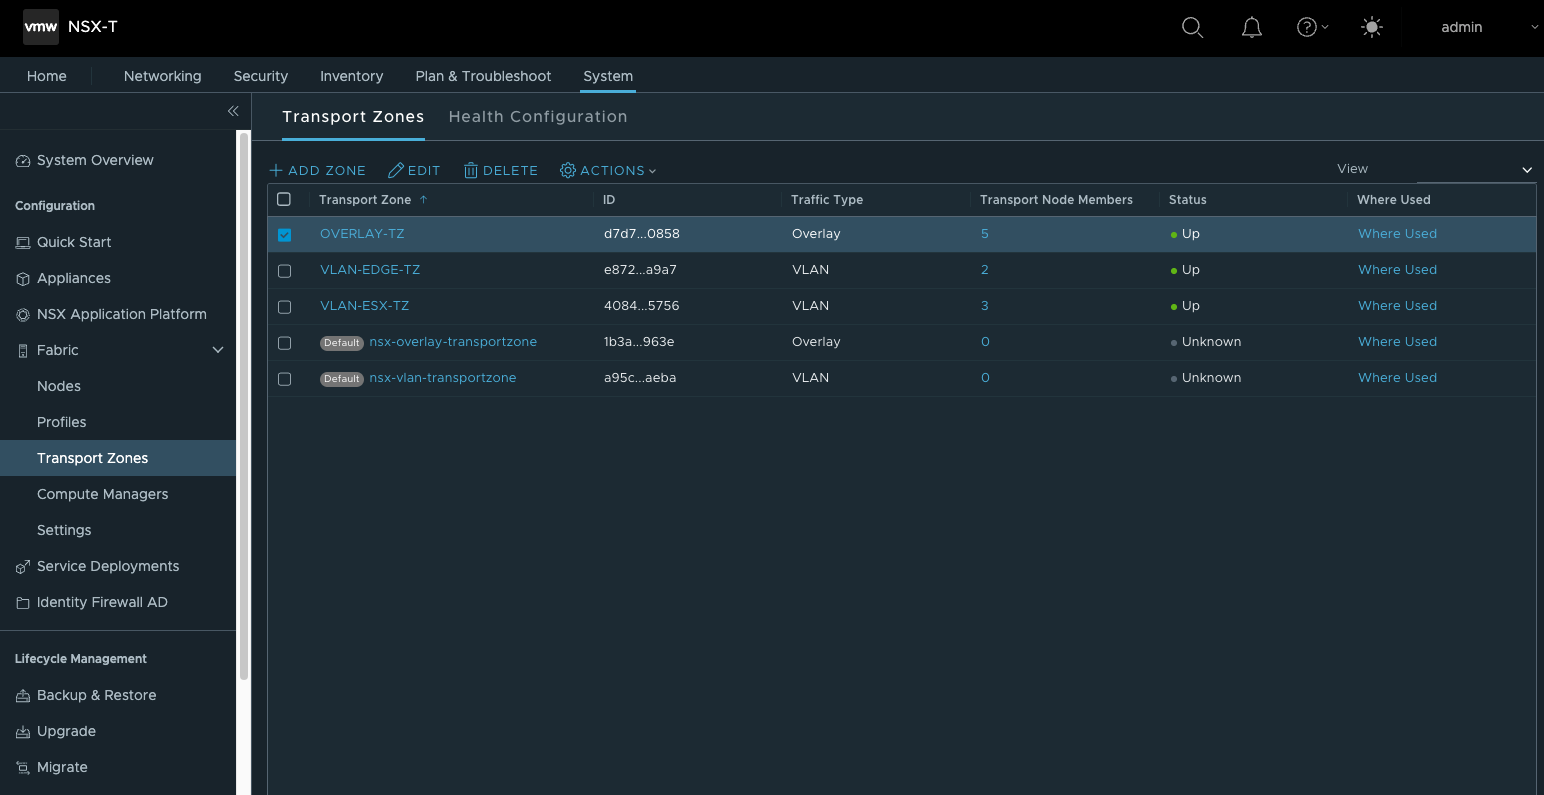
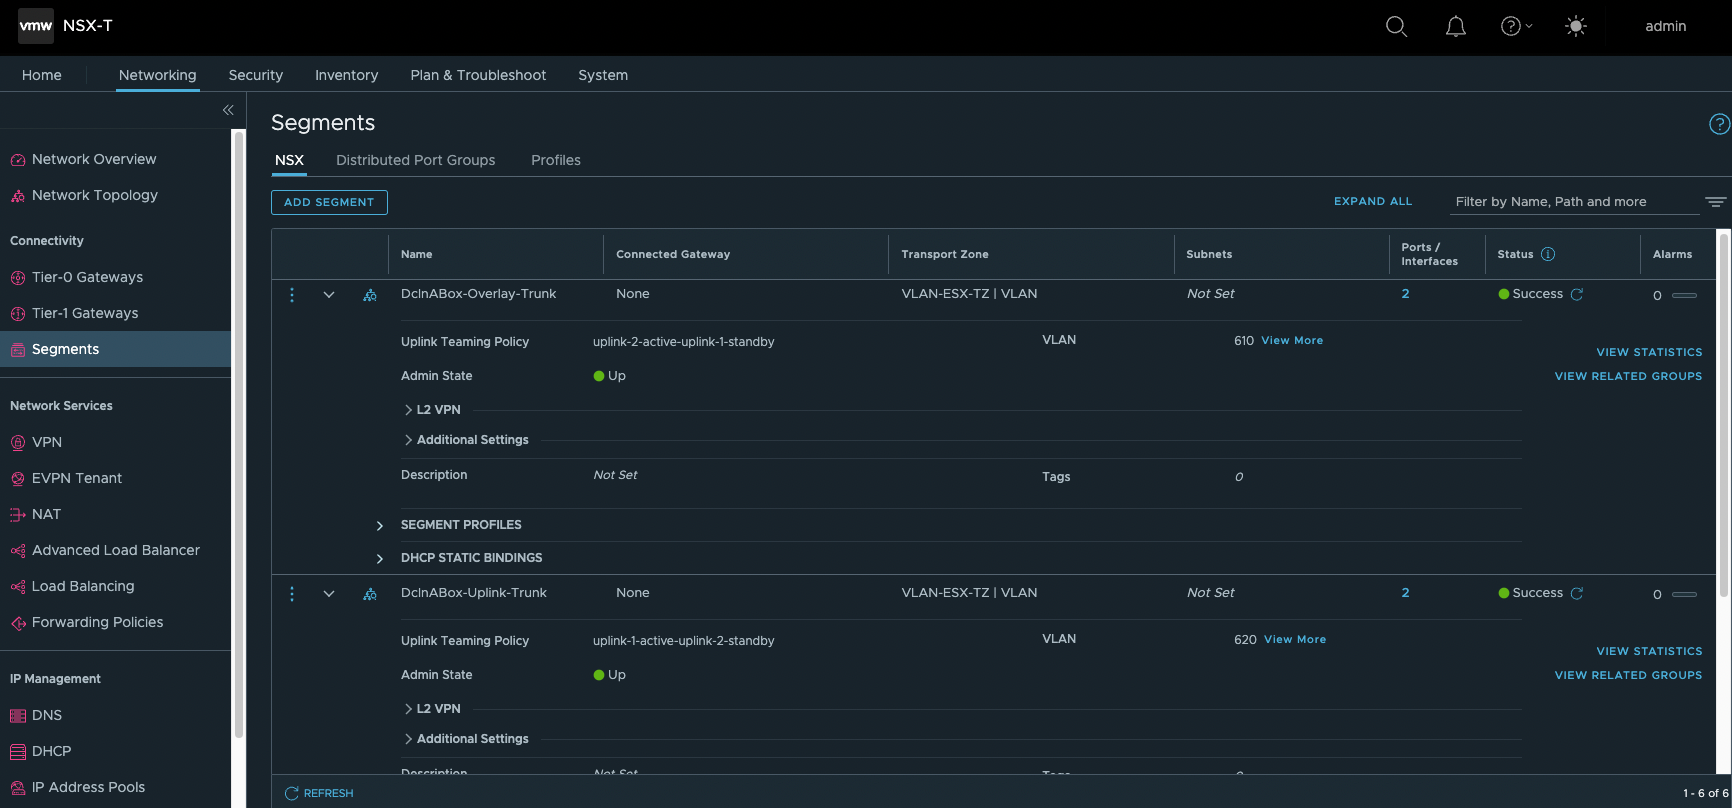
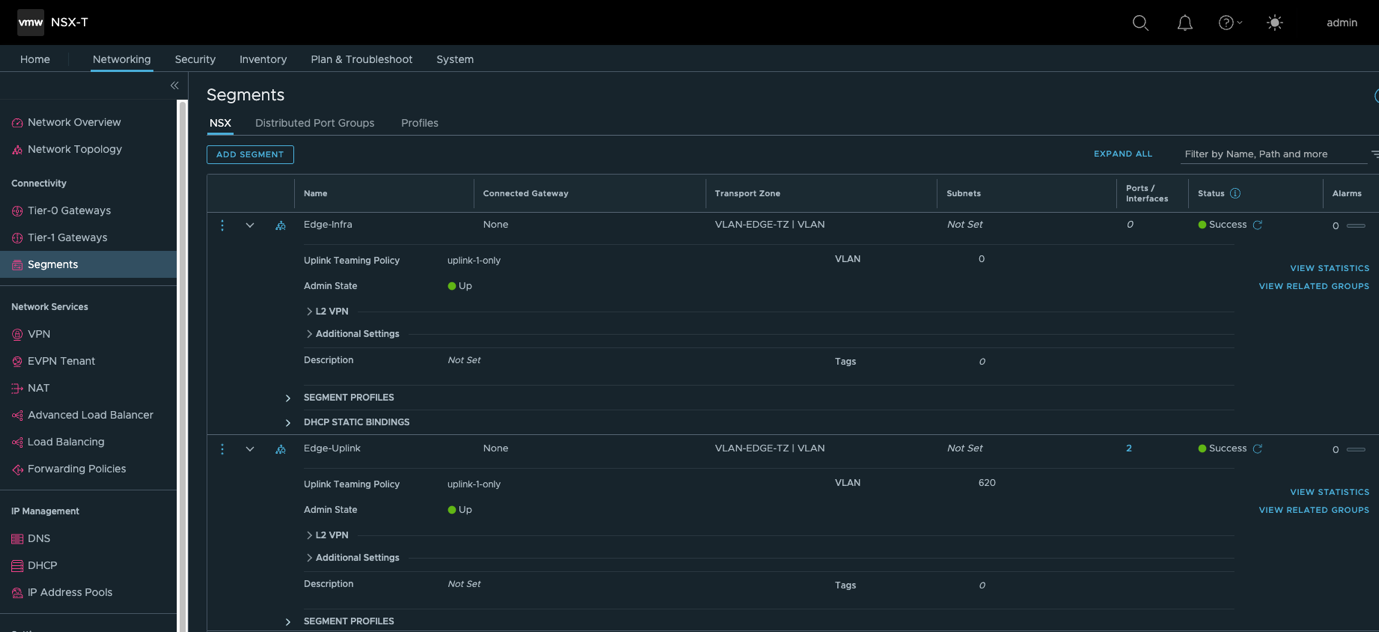
- 创建Transport Zone,在NSX中会创建3个TZ,OVERLAY-TZ与VLAN-ESX-TZ用于主机传输节点,OVERLAY-TZ与VLAN-EDGE-TZ用于EDGE节点。

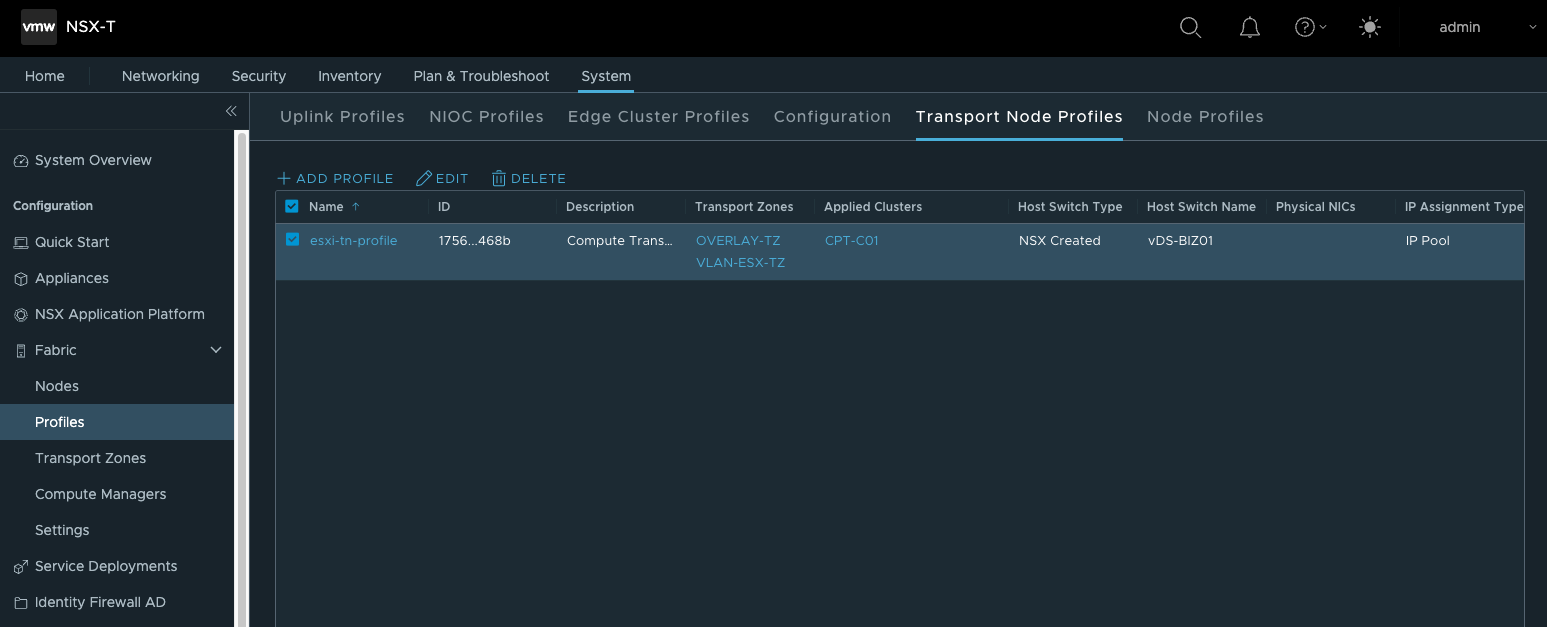
- 创建Transport Node Profiles

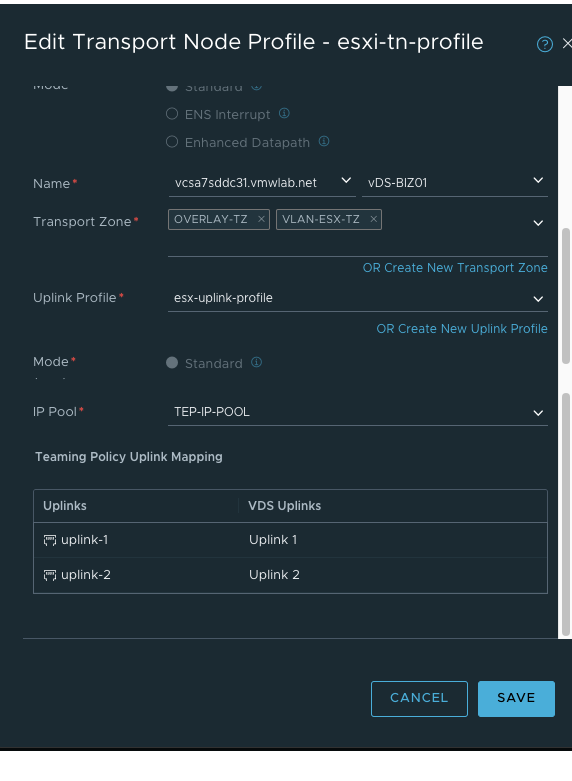
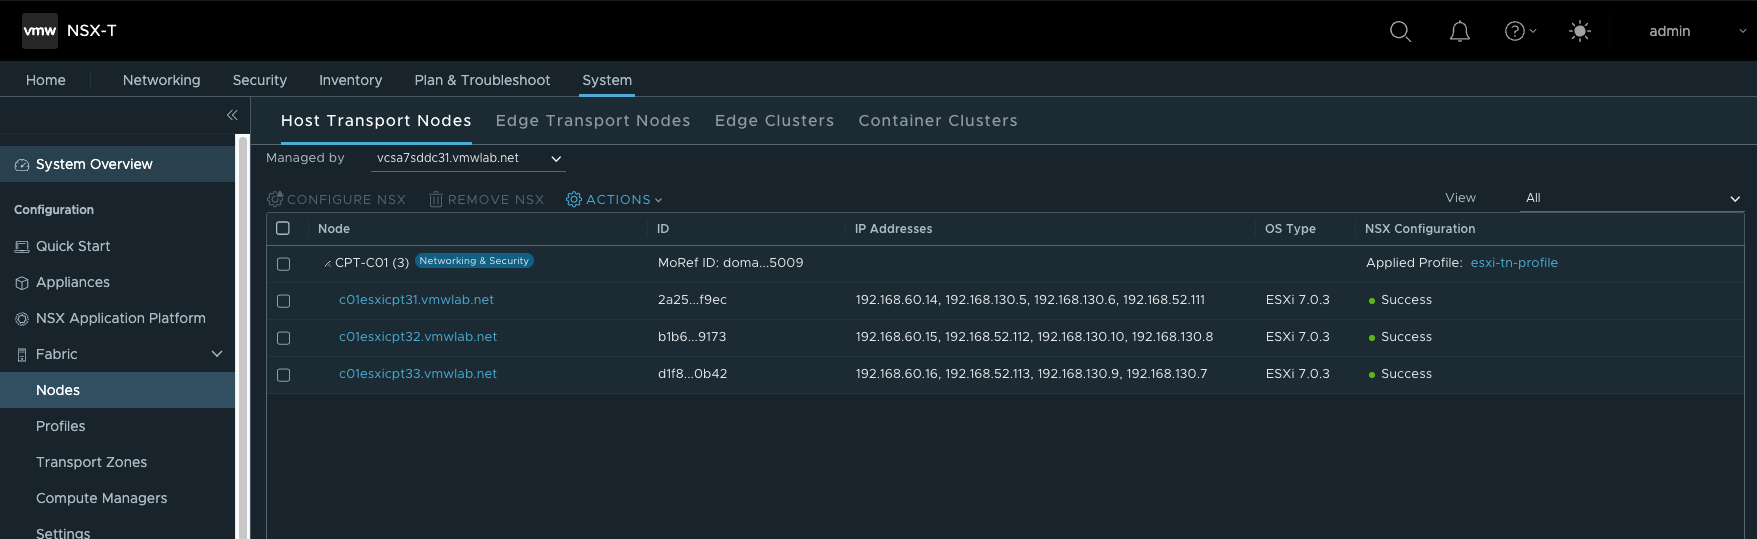
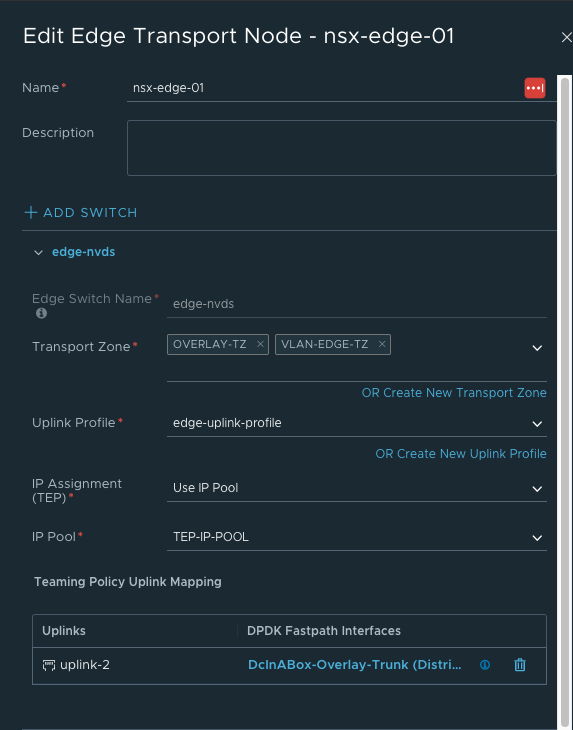
- 部署Transport Node,并关联前步骤中已创建的Transport Node Profiles
![]()
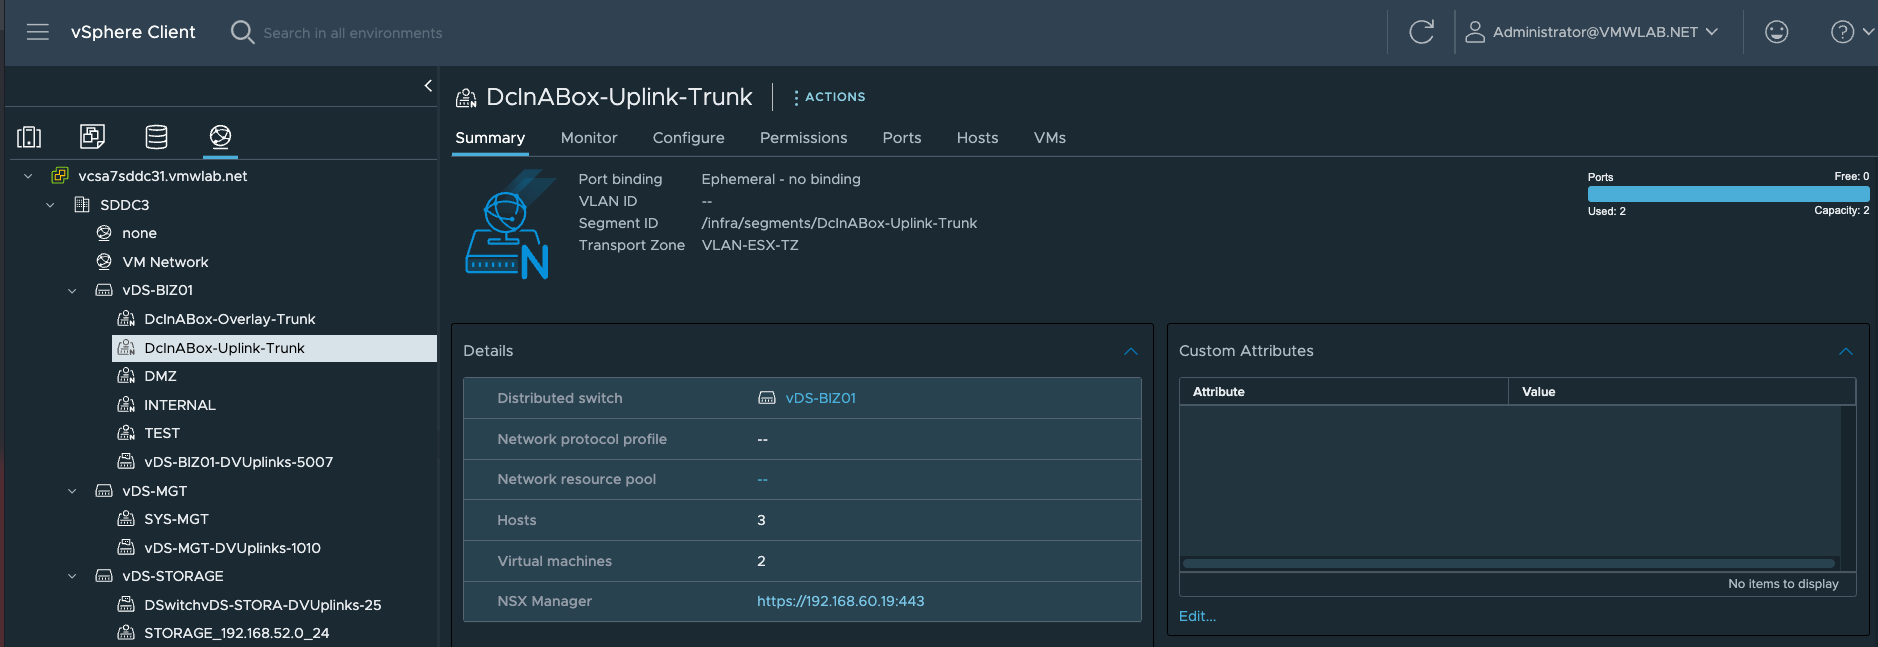
- 创建vDS上联的Uplink

Note:1.这里需要注意的是通常Edge上联接口所关联DVS中的分布式端口组,是预先在vCenter中手工创建的。但通过Ansible自动化部署时,借助NSX自动创建属于ESXi所在TZ的VLAN Segments(相当于DVS中的分布式PortGroup), 由NSX同步到vCenter。 2.最终TEP VLAN 610 关联到uplink2 ,Edge Uplink VLAN 620 关联到了uplink1 |


- 创建Edge Transport Node
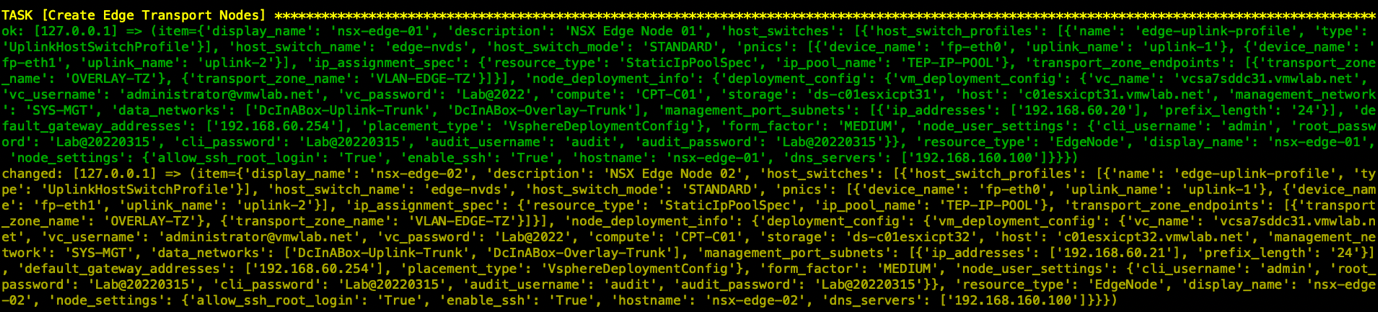
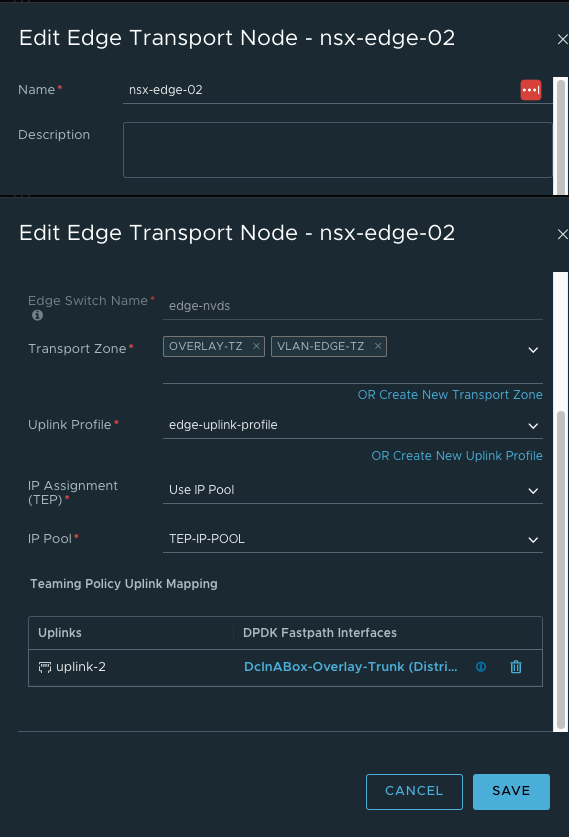
- 创建Edge Cluster并将Edge Transport Node加入集群


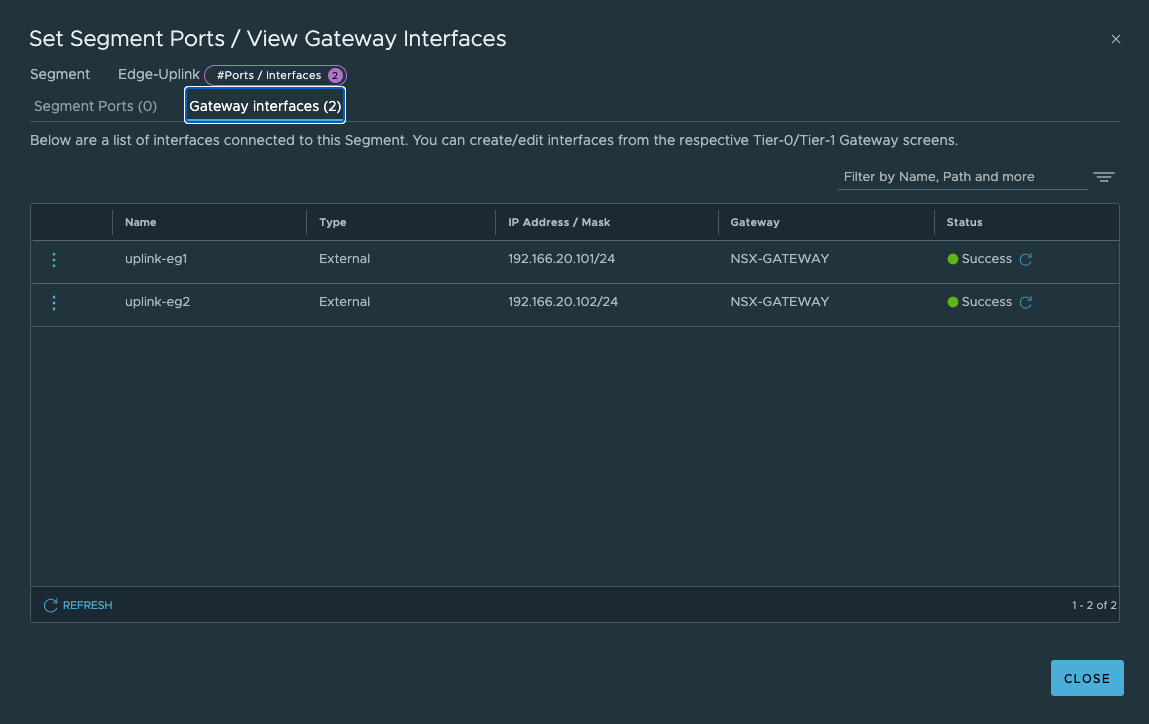
- 创建两个Edge Node的Uplink Vlan分段Edge-Uplink,所属TZ为VLAN-EDGE-TZ,并配置Edge Node上联接口地址。

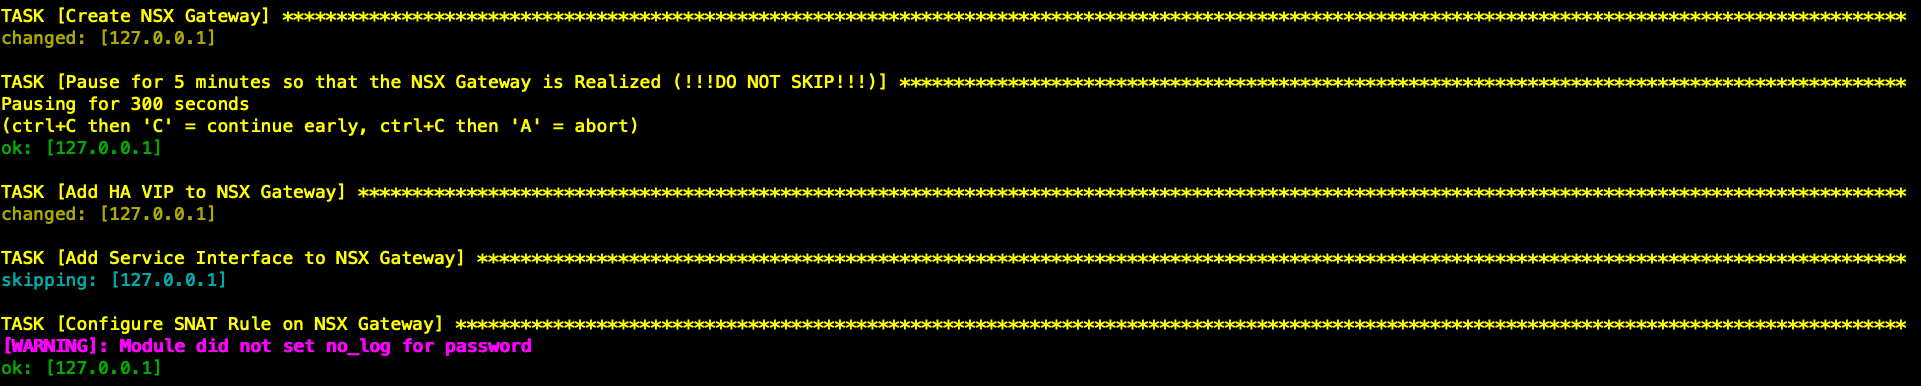
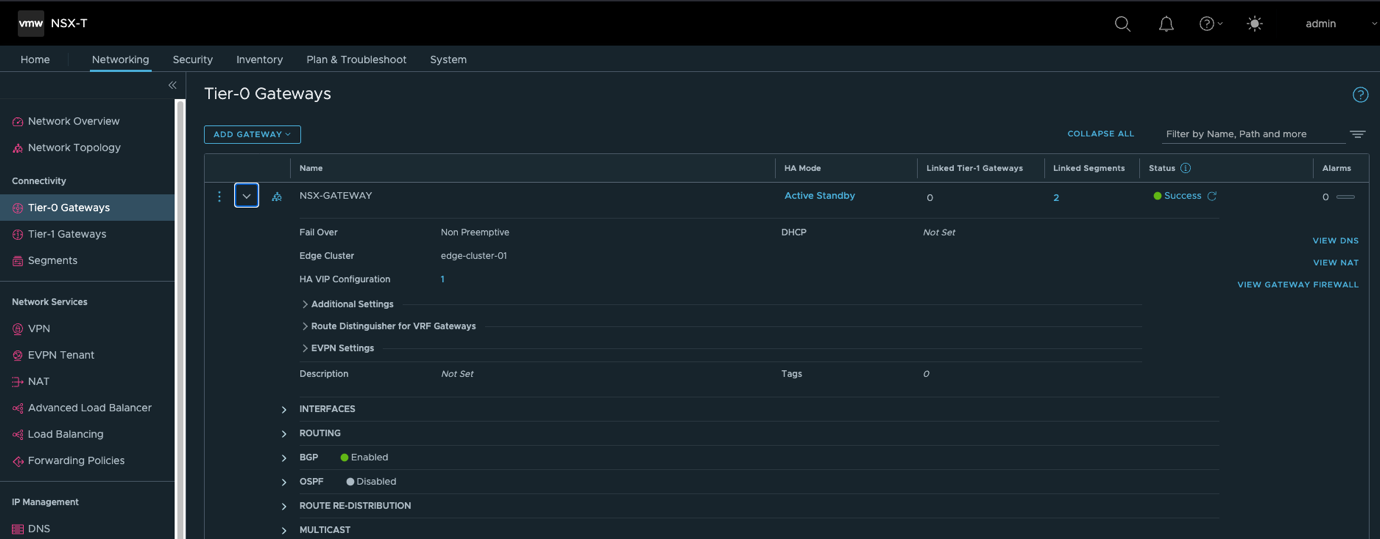
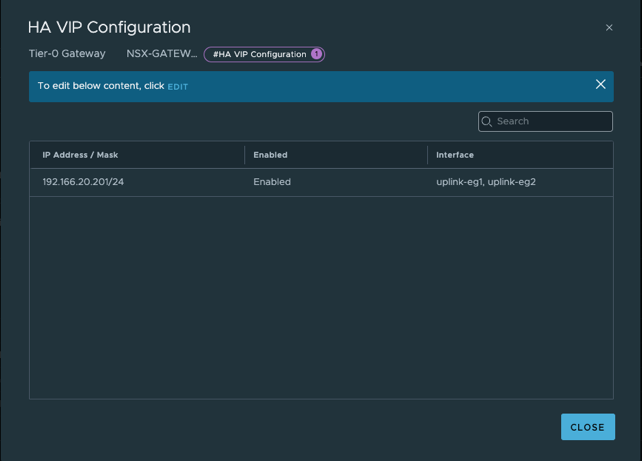
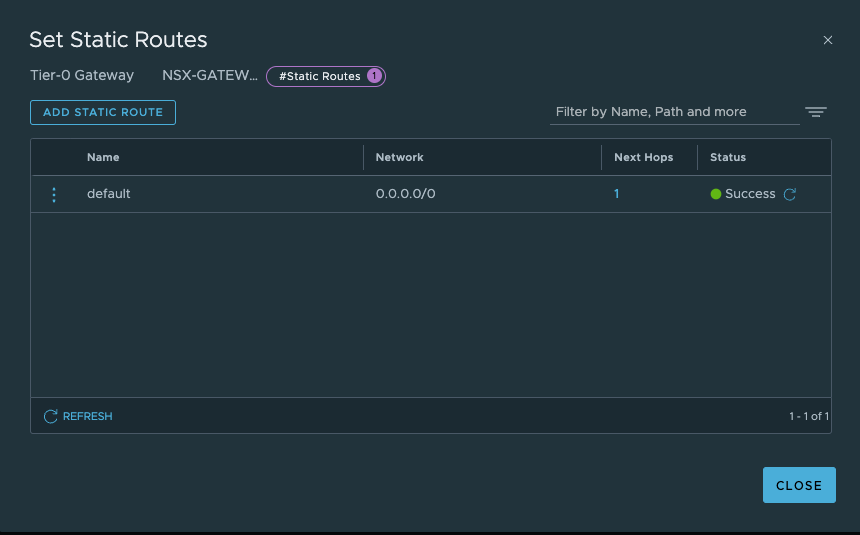
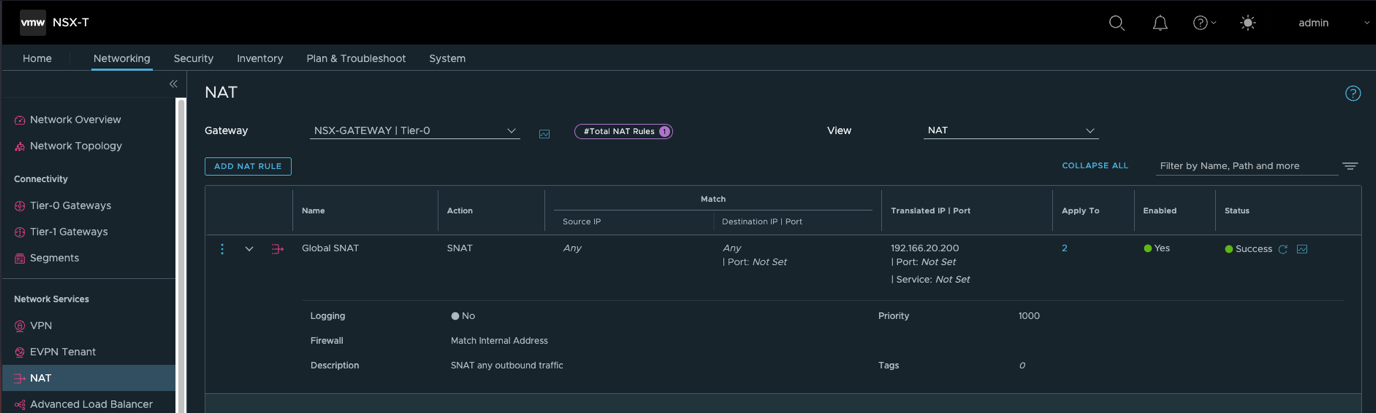
- 创建NSX网关T0(A/S),配置HA VIP,南北向缺省路由及SNAT让工作负载可以访问外部网络。
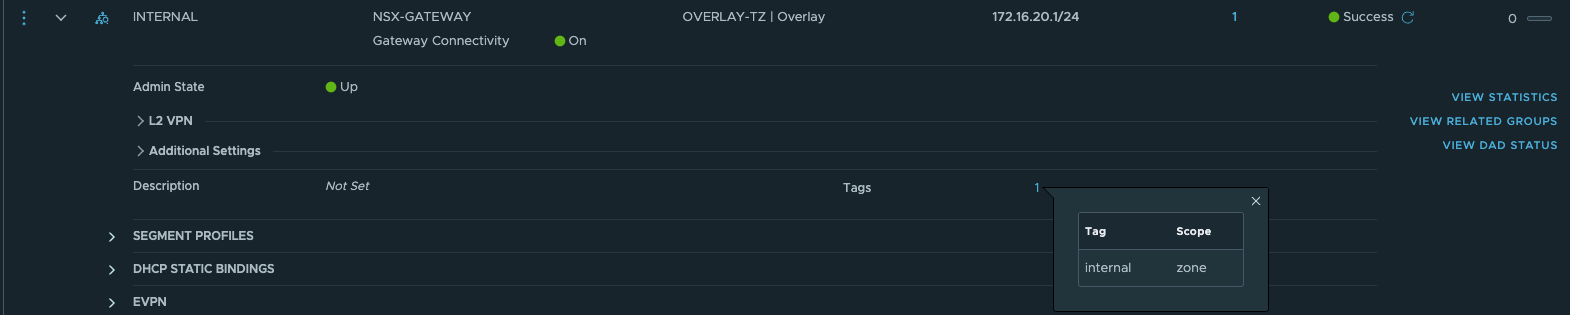
- 创建Overlay分段


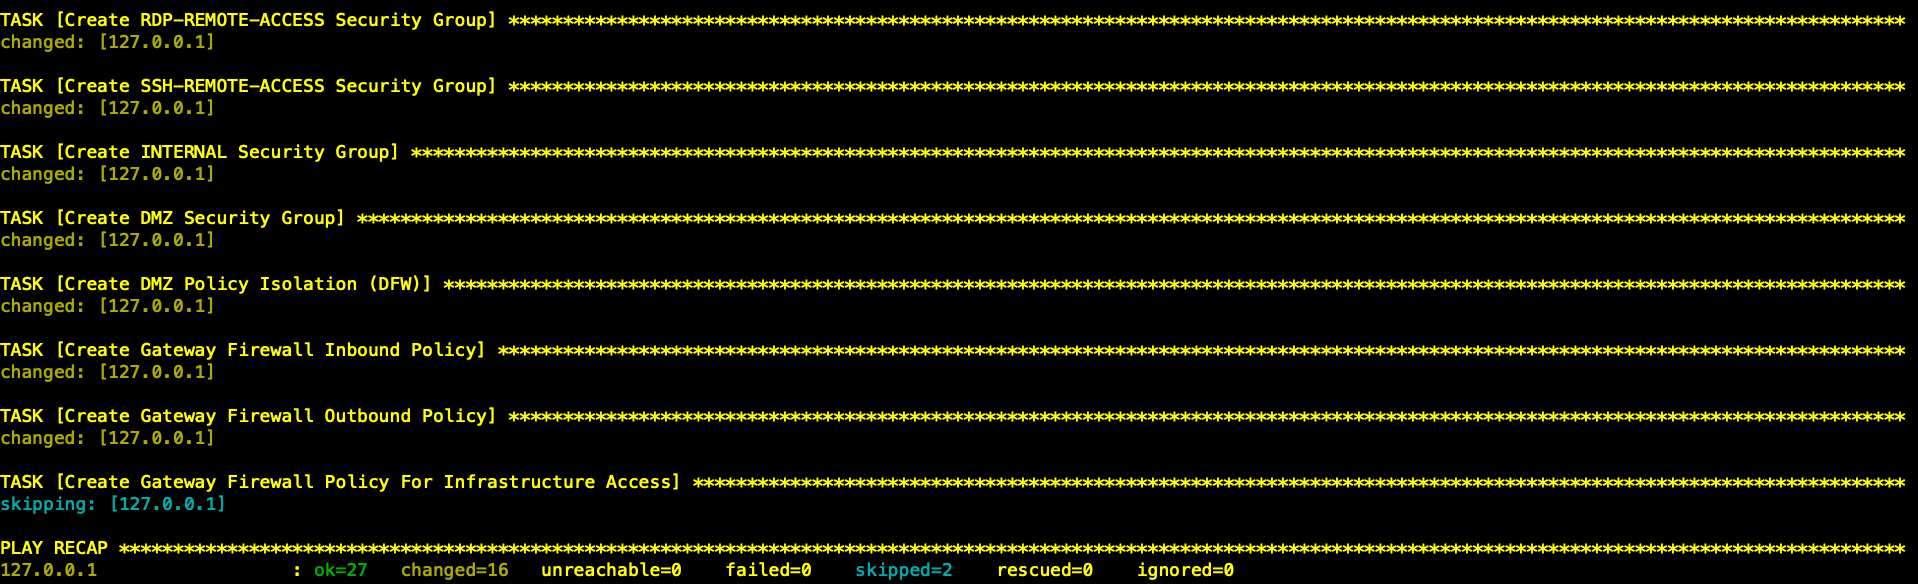
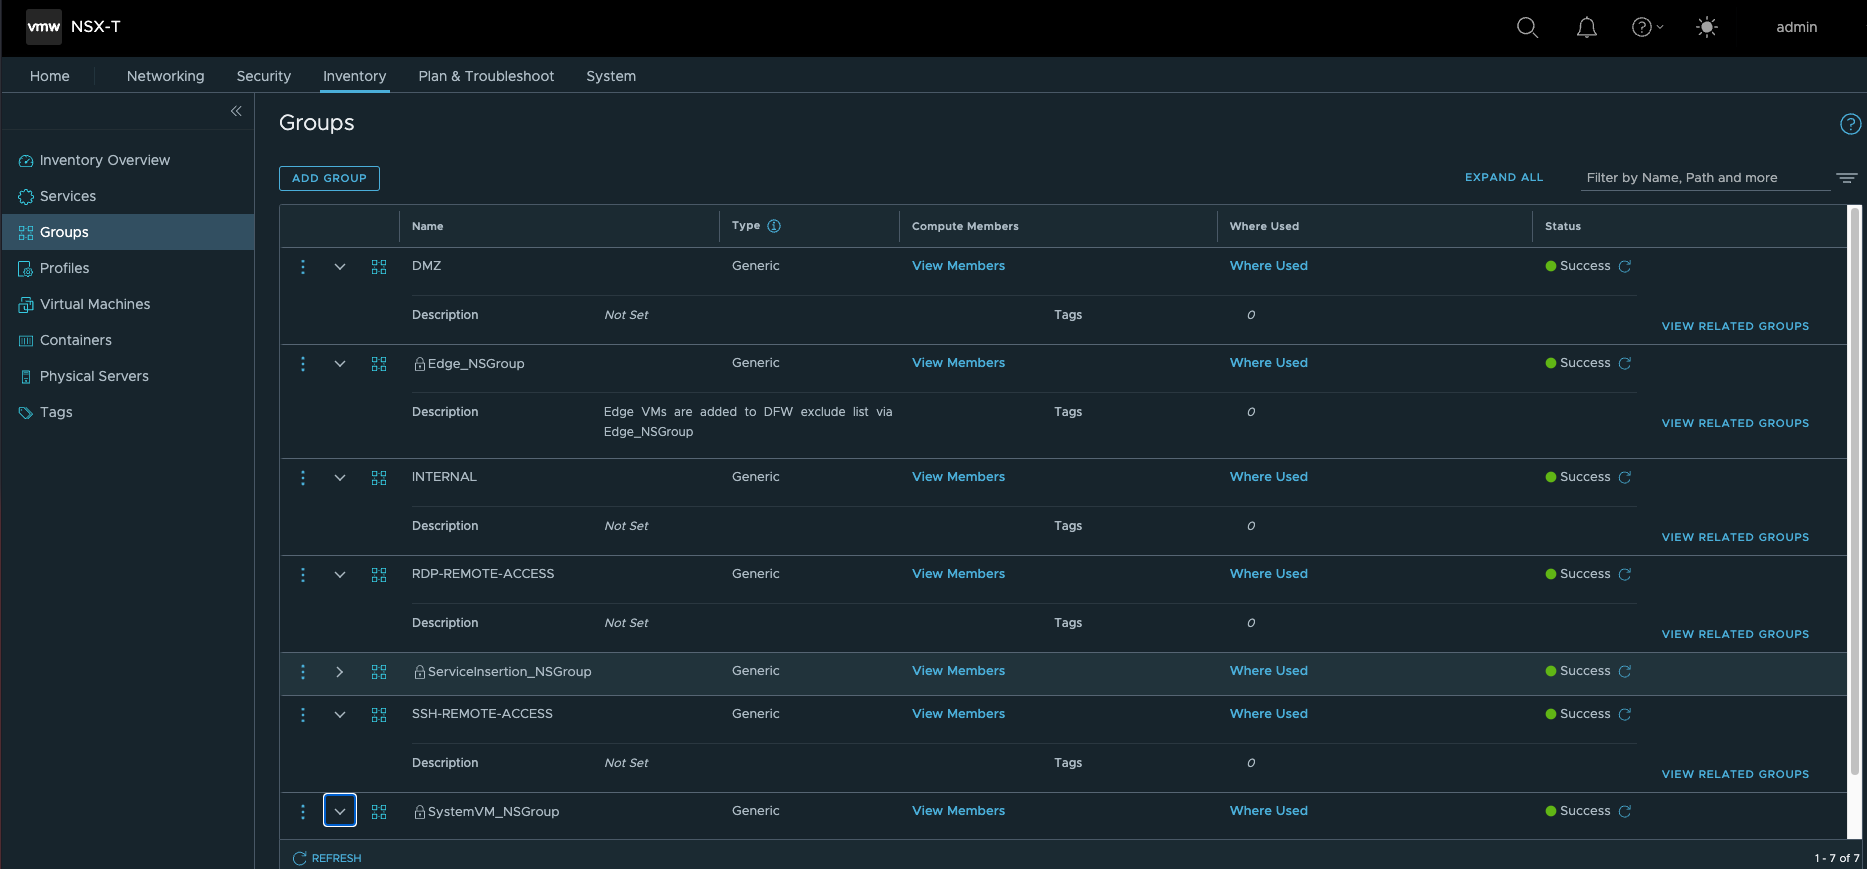
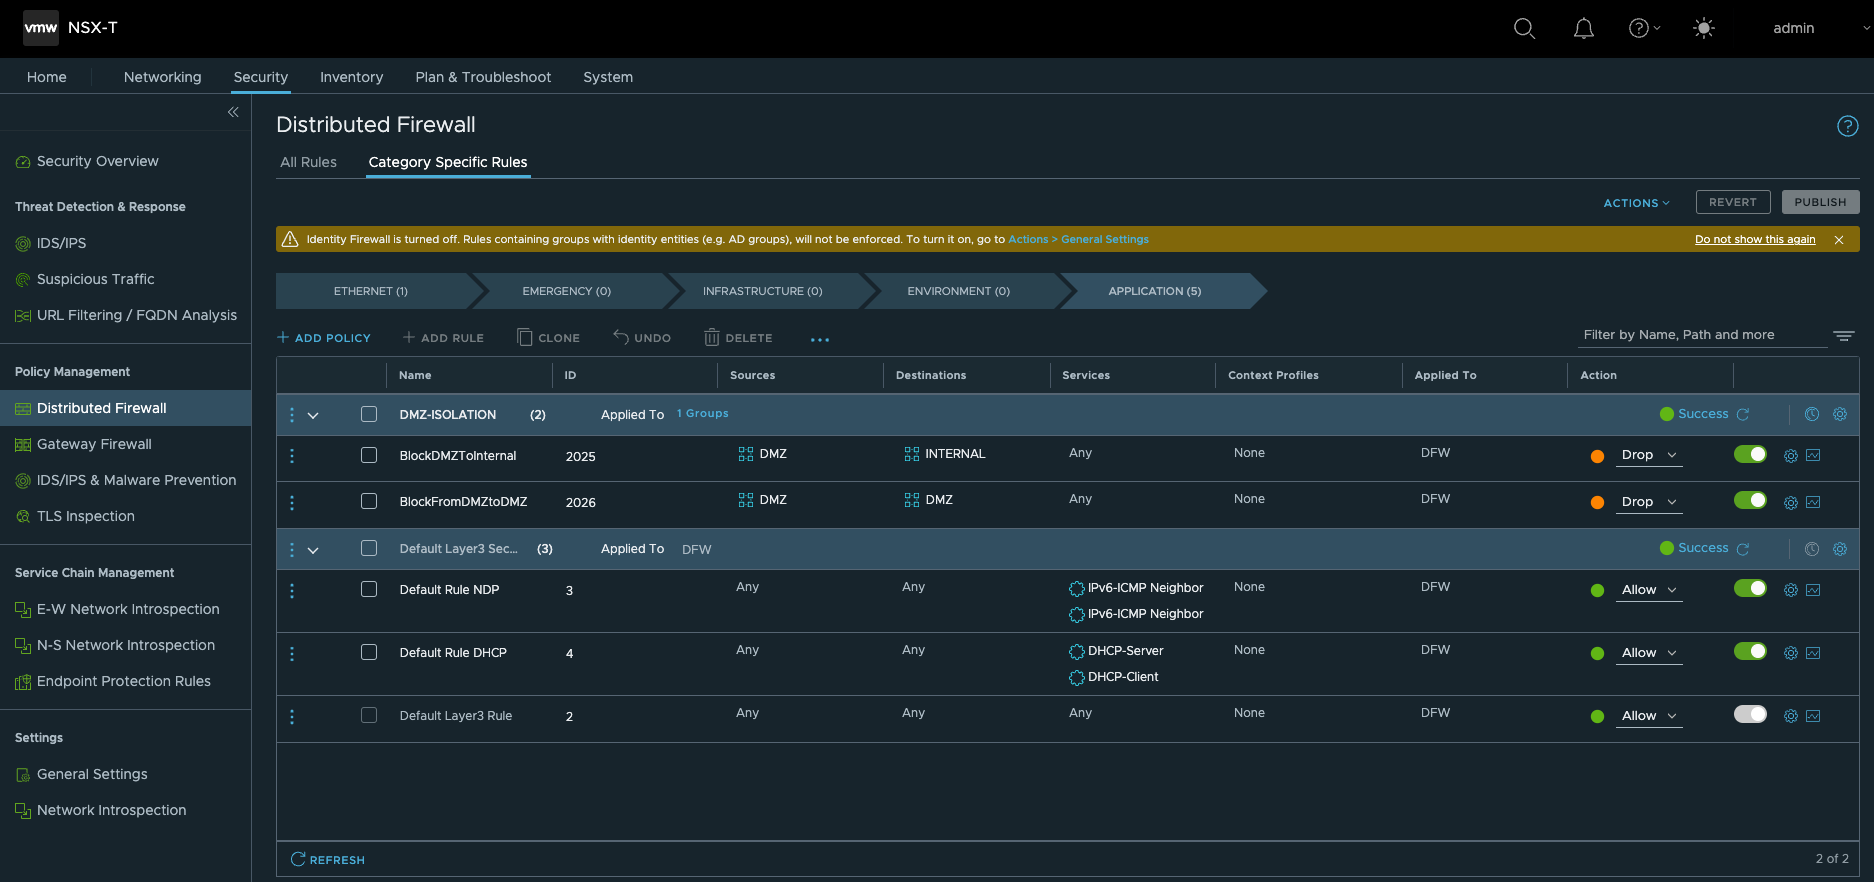
- 创建安全组及火墙策略,通过Ansible使用基于Zone的安全部署模型。缺省自动配置DMZ,INTERNAL两个逻辑Zone(Security Group),并配置了对应的安全策略。
分布式防火墙策略
- 缺省情况下,INTERNAL可以访问DMZ
- 缺省情况下,DMZ没有访问其它Zone的权限
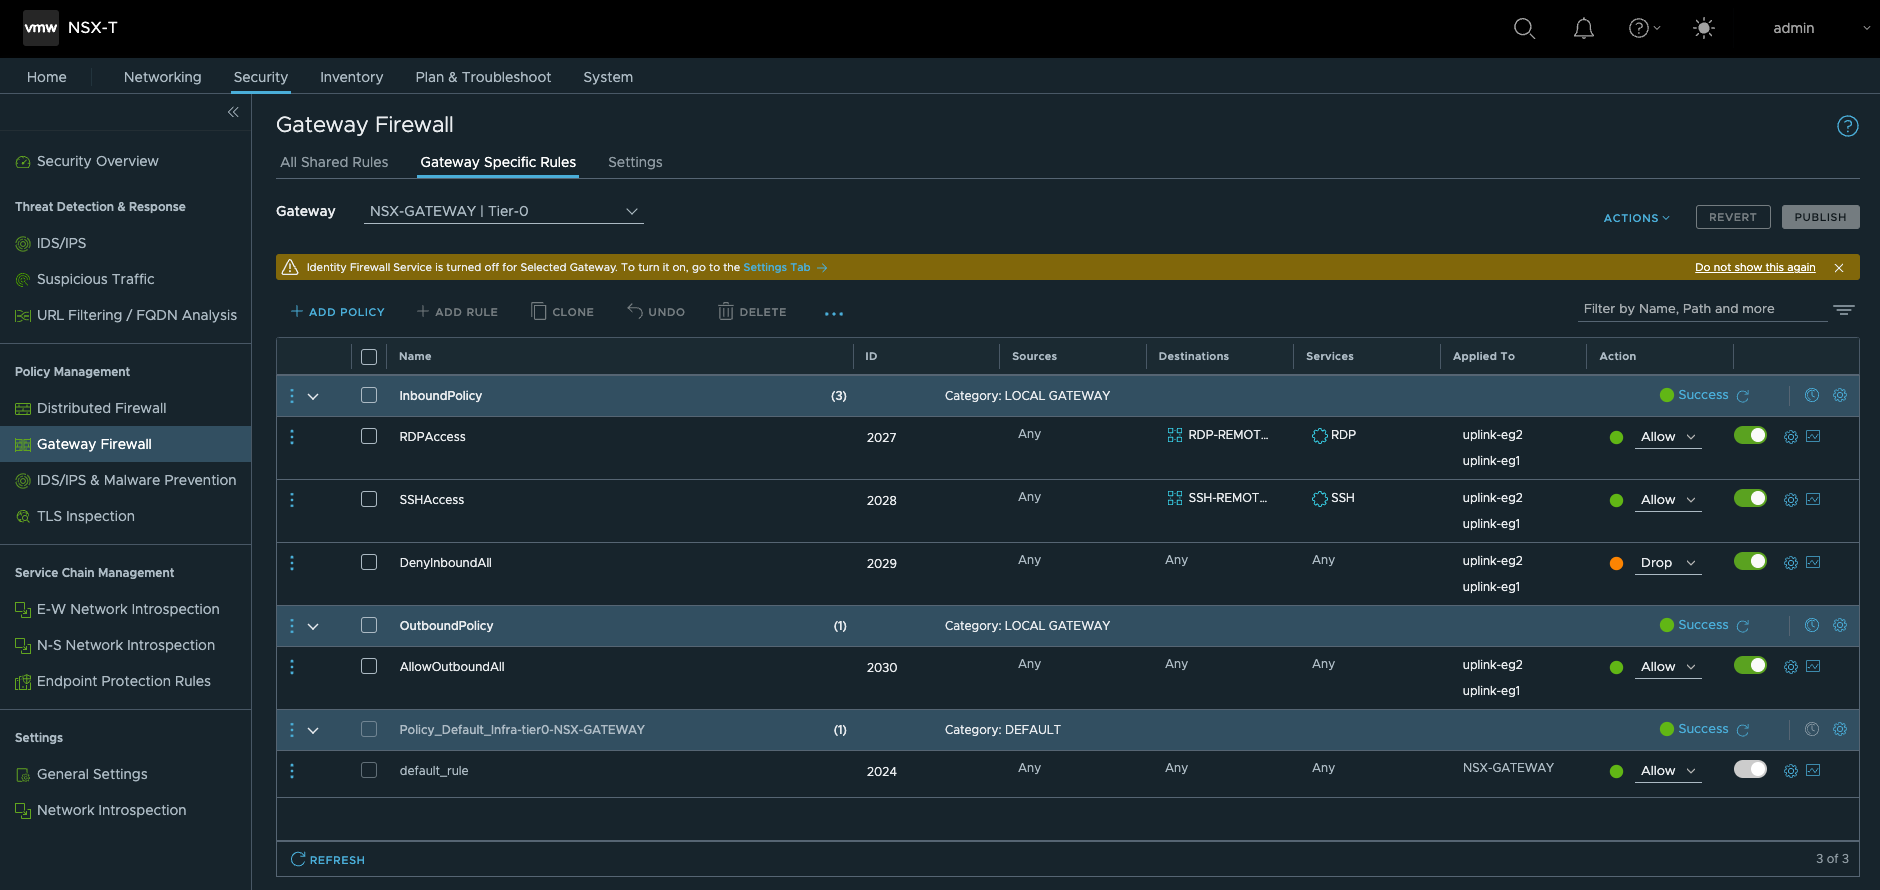
网关防火墙策略
- 缺省情况下,出站策略所有区域都可以访问Internet
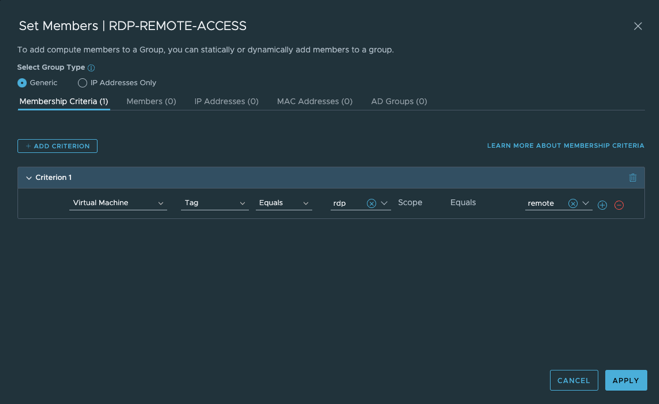
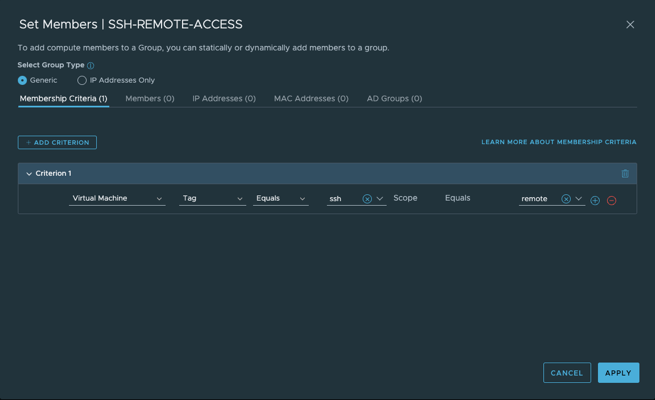
- 缺省情况下,入站策略除了RDP和SSH之外拒绝所有其它入站流量,只需要通过给工作负载应用相应的tag,把它变成初始化时建立的RDP,SSH组中的成员即可放行RDP,SSH的管理流量。
下一代防火墙配置(T1)
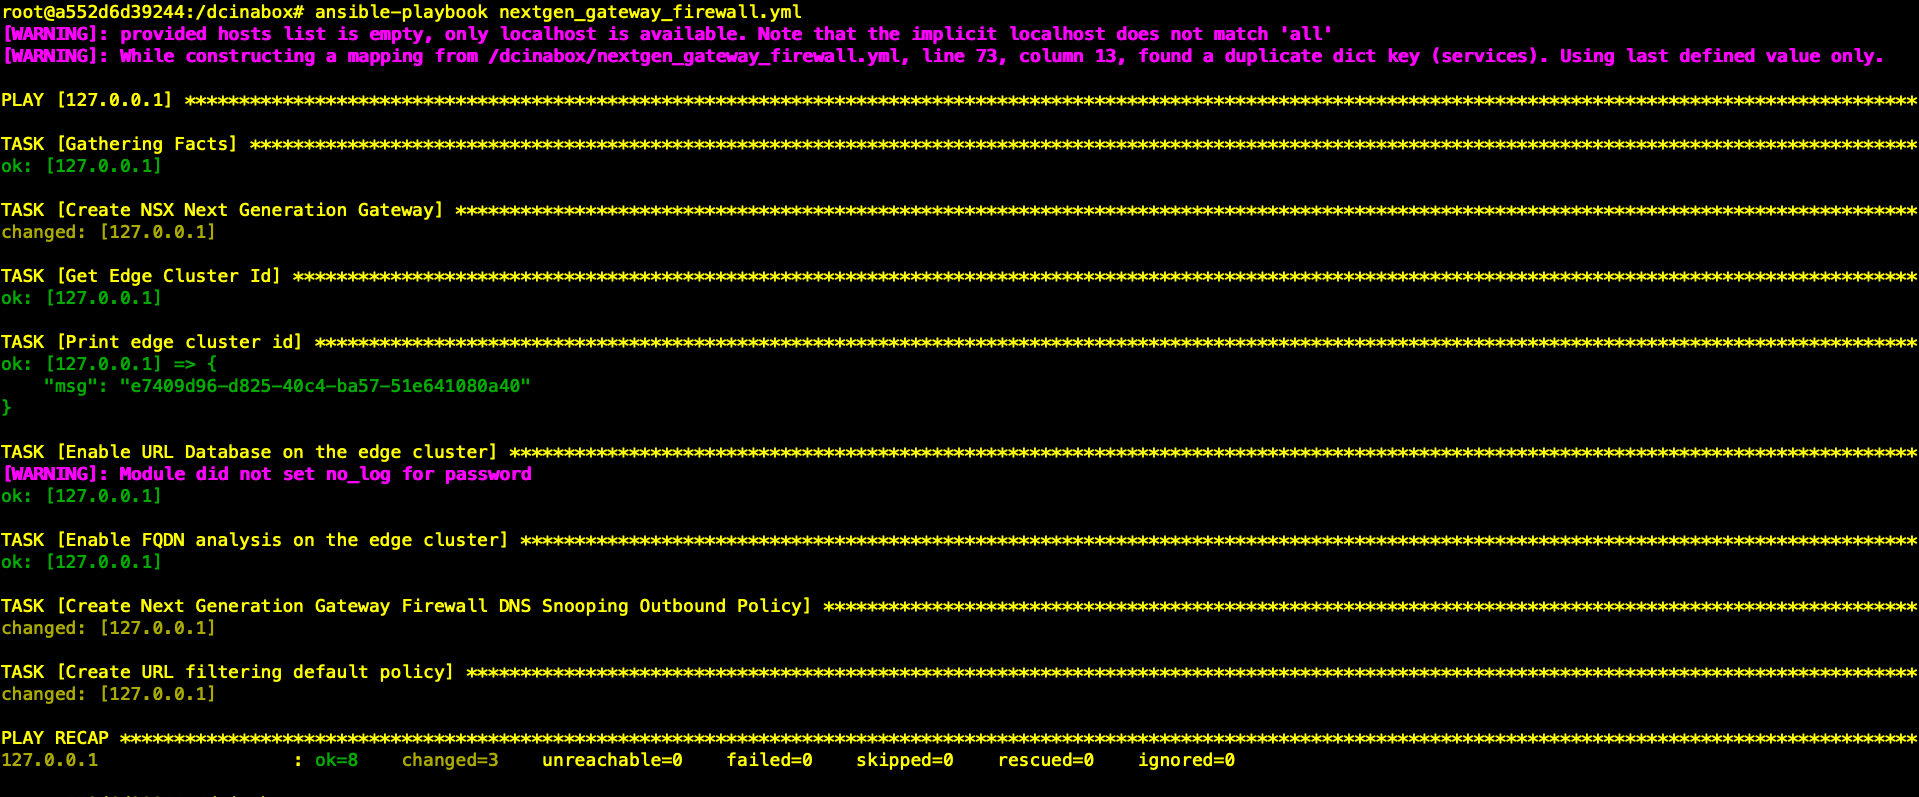
第1步:运行Playbook 开始部署 T1网关及防火墙规则
| root@a552d6d39244:/dcinabox# ansible-playbook nextgen_gateway_firewall.yml |
阶段性自动化成果
此阶段完成后,登录NSX Manager,已自动完成了如下部署:
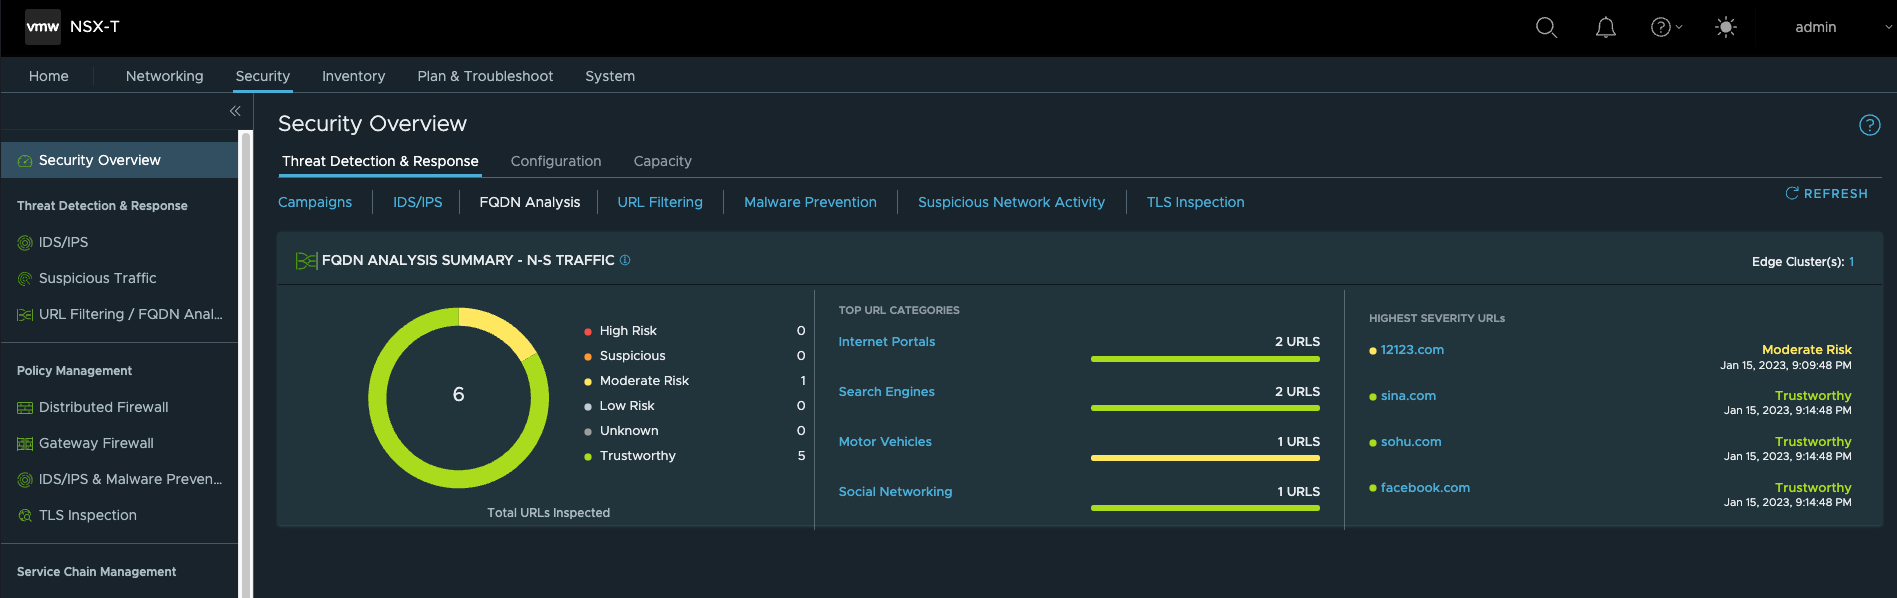
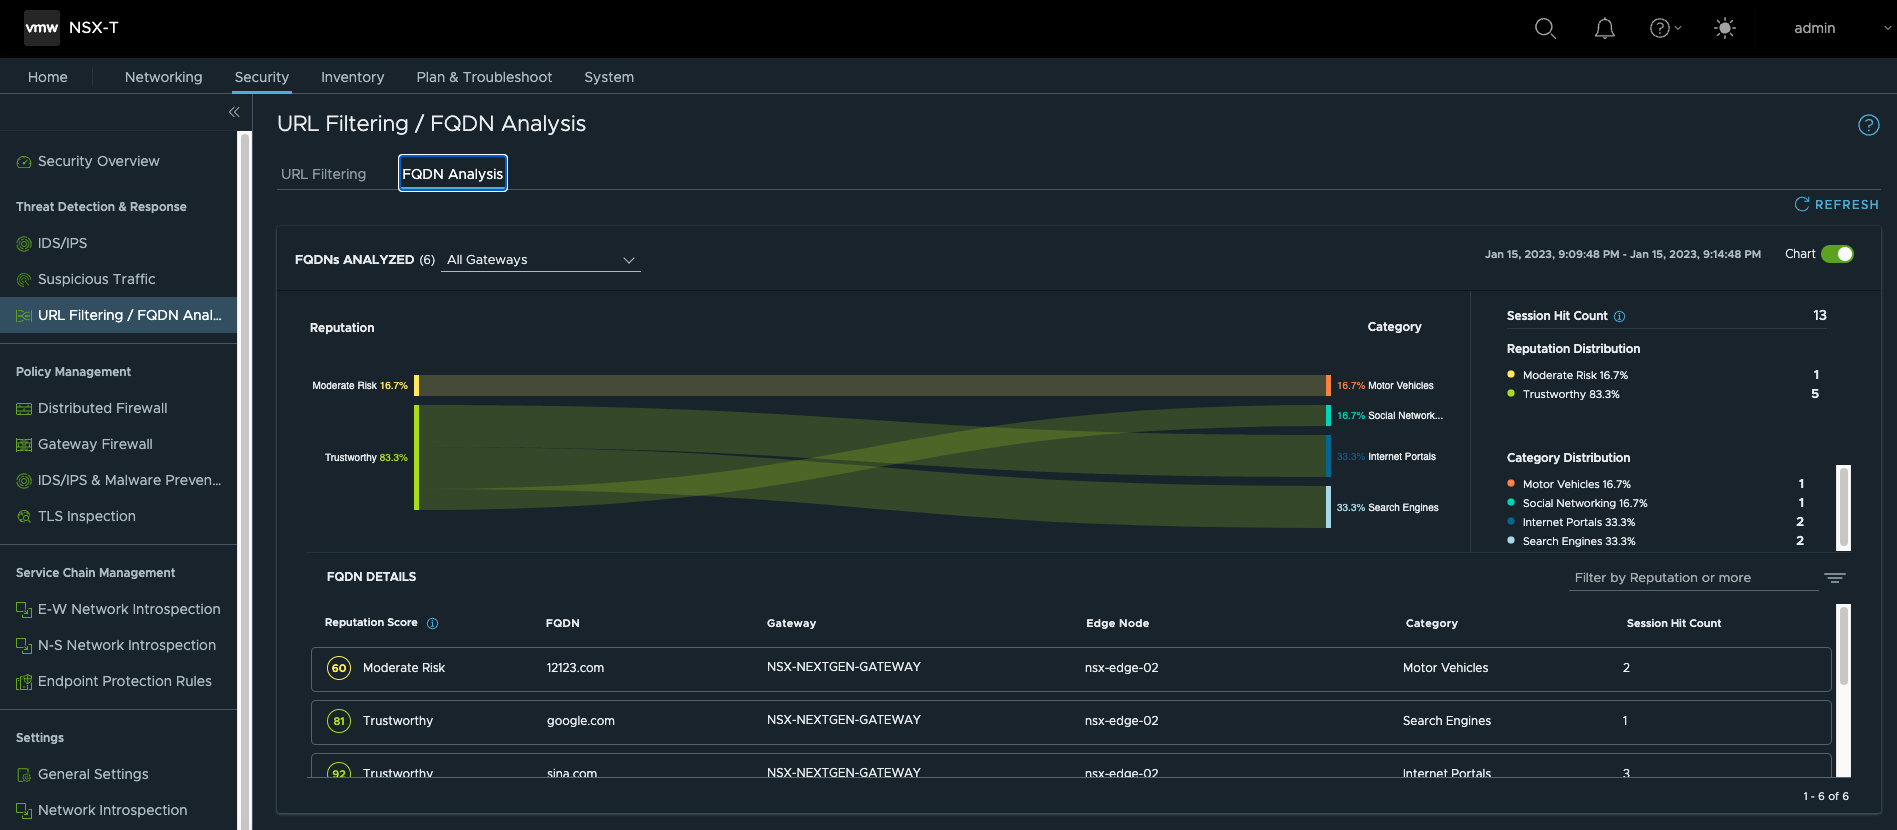
- 创建T1网关,并关联到T0。

- 在T1网关上使能FQDN Analysis功能
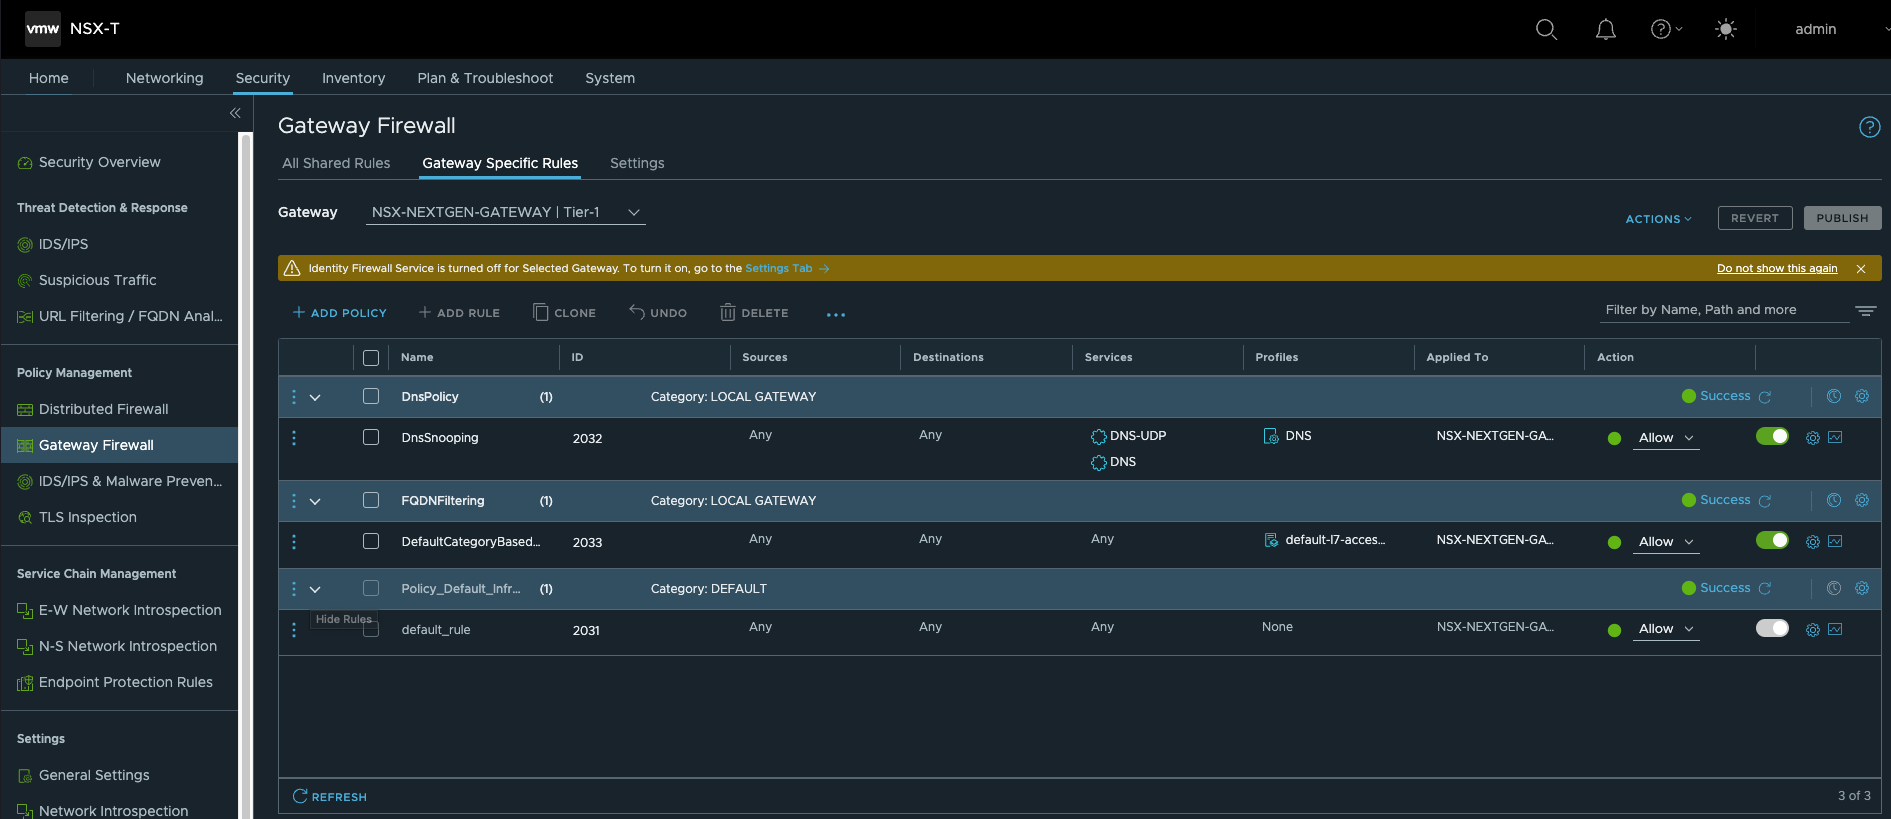
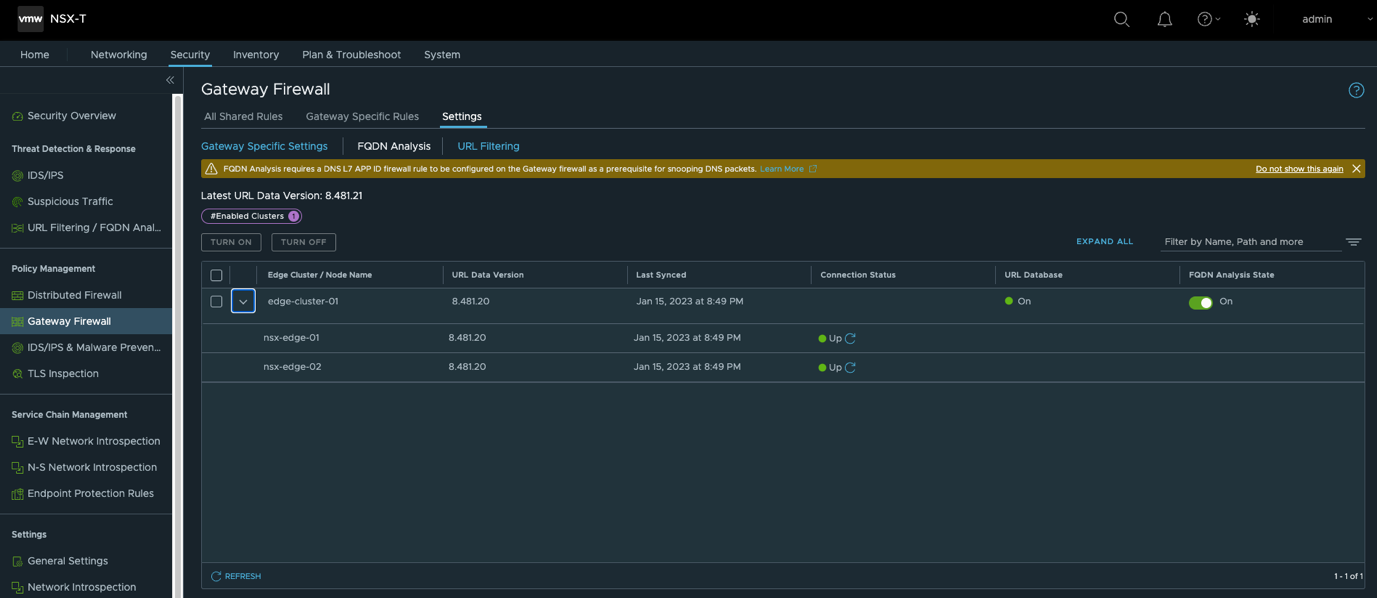
- 使能URL Filtering功能,具体策略需要根据实际环境手工配置
- 要使用T1网关,需要手动将VM从T0迁移到T1,迁移到T1后可以看到FQDN Analysis功能已经生效。